Blog

  • Genius

    Genius: A SaaS AI Platform

    Genius is a SaaS AI Platform built using Next.js 14, React, and Tailwind CSS. It provides various AI-powered tools for generating images, videos, conversations, music, and code based on user prompts.

    Features

    • AI-Powered Tools:

      • Image Generation Tool: Utilizes OpenAI for generating images based on user prompts.
      • Video Generation Tool: Utilizes Replicate AI for generating videos based on user prompts.
      • Conversation Generation Tool: Utilizes OpenAI for generating conversations based on user prompts.
      • Music Generation Tool: Utilizes Replicate AI for generating music based on user prompts.
      • Code Generation Tool: Utilizes OpenAI for generating code snippets based on user prompts.
    • Page Loading State: Includes a loading state indicator to enhance user experience during page transitions.

    • Tailwind Design: Utilizes Tailwind CSS for modern and customizable UI design.

    • Animations and Effects: Implements Tailwind animations and effects to enhance user interaction.

    • Full Responsiveness: Ensures seamless user experience across various devices and screen sizes.

    • Clerk Authentication: Supports authentication via email and Google accounts using Clerk Authentication.

    • Client Form Validation: Implements client-side form validation using react-hook-form and zod for improved data integrity.

    • Server Error Handling: Provides robust server error handling using react-toast to notify users of any issues.

    Technologies Used

    • Next.js 14
    • React
    • TypeScript
    • Tailwind CSS
    • OpenAI
    • Replicate AI
    • Clerk
    • shadcn/ui

    Environment Setup

    Before executing the project, ensure to create a .env file with the following environment variables:

    NEXT_PUBLIC_CLERK_PUBLISHABLE_KEY=''
    CLERK_SECRET_KEY=''
    
    NEXT_PUBLIC_CLERK_SIGN_IN_URL=/sign-in
    NEXT_PUBLIC_CLERK_SIGN_UP_URL=/sign-up
    NEXT_PUBLIC_CLERK_AFTER_SIGN_IN_URL=/dashboard
    NEXT_PUBLIC_CLERK_AFTER_SIGN_UP_URL=/dashboard
    
    OPENAI_API_KEY=''
    REPLICATE_API_TOKEN=''
    

    Installation

    1. Clone the repository.
    2. Navigate to the project directory.
    3. Install dependencies using npm install or yarn install.

    Usage

    1. Set up the environment variables in the .env file.
    2. Start the development server using npm run dev or yarn dev.
    3. Access the application in your preferred web browser.

    Visit original content creator repository
    https://github.com/rajat-03/Genius

  • mastering-gitops

    kubectl apply -f cloud-infrastructure.yaml with Crossplane

    Demo repository for my Crossplane conference talk.

    Prerequisites

    You need to have the following tools installed locally to be able to complete all steps:

    Local Installation

    For local installation simply follow the instructions found on the official Crossplane documentation.

    # install latest Crossplane release using Helm in a dedicated namespace
    kubectl create namespace crossplane-system
    
    helm repo add crossplane-stable https://charts.crossplane.io/stable
    helm repo update
    
    helm install crossplane --namespace crossplane-system crossplane-stable/crossplane --set provider.packages={crossplane/provider-aws:v0.24.1}
    
    ## check everything came up OK
    helm list -n crossplane-system
    kubectl get all -n crossplane-system

    Bootstrapping

    # define required ENV variables for the next steps to work
    $ export AWS_ACCOUNT_ID=`aws sts get-caller-identity --query Account --output text`
    $ export GITHUB_USER=lreimer
    $ export GITHUB_TOKEN=<your-token>
    
    # setup an EKS cluster with Flux2
    $ make create-eks-cluster
    $ make bootstrap-eks-flux2
    
    # setup a GKE cluster with Flux2
    $ make create-gke-cluster
    $ make bootstrap-gke-flux2
    
    # modify Flux kustomization and add
    # - cluster-sync.yaml
    # - notification-receiver.yaml
    # - receiver-service.yaml
    # - webhook-token.yaml
    # - image-update-automation.yaml
    
    # you also need to create the webhook for the Git Repository
    # Payload URL: http://<LoadBalancerAddress>/<ReceiverURL>
    # Secret: the webhook-token value
    $ kubectl -n flux-system get svc/receiver
    $ kubectl -n flux-system get receiver/webapp
    
    $ make destroy-clusters

    AWS Provider

    For AWS the configuration needs to reference the required credentials in the form of a secret.
    These are basically the aws_access_key_id and aws_secret_access_key from the default profile found in the ${HOME}/.aws/credentials file. With this information we can create a secret and reference it from a provider config resource.

    kubectl create secret generic aws-credentials -n crossplane-system --from-file=credentials=${HOME}/.aws/credentials
    
    # we could manually installe the AWS provider
    # kubectl crossplane install provider crossplane/provider-aws:v0.24.1
    
    cd crossplane/aws/
    kubectl apply -n crossplane-system -f provider.yaml
    kubectl apply -n crossplane-system -f providerconfig.yaml
    
    kubectl get events
    kubectl get crds
    
    # create an S3 bucket in eu-central-1
    kubectl apply -f s3/bucket.yaml
    aws s3 ls
    
    # create an ECR in eu-central-1
    kubectl apply -f ecr/repository.yaml
    aws ecr describe-repositories
    
    # create SNS topic and subscription
    kubectl apply -f sns/topic.yaml
    aws sns list-topics
    kubectl apply -f sns/subscription.yaml
    aws sns list-subscriptions
    aws sns publish --subject Test --message Crossplane --topic-arn arn:aws:sns:eu-central-1:<AWS_ACCOUNT_ID>:email-topic
    
    # create a SQS queue
    kubectl apply -f sqs/queue.yaml
    aws sqs list-queues
    
    # create Aurora Serverless
    kubectl apply -f db/aurora-serverless.yaml
    aws rds describe-db-clusters
    kubectl apply -f db/aurora-client.yaml
    
    # use XRD to create an ECR
    kubectl apply -f xrd/repository/definition.yaml
    kubectl apply -f xrd/repository/composition.yaml
    kubectl apply -f xrd/repository/examples/example-repository.yaml
    
    cd xrd/repository/
    kubectl crossplane build configuration --ignore=examples/example-repository.yaml
    
    # use XRD to create an S3 bucket
    kubectl apply -f xrd/bucket/definition.yaml
    kubectl apply -f xrd/bucket/composition.yaml
    kubectl apply -f xrd/bucket/examples/example-bucket.yaml
    
    cd xrd/bucket/
    kubectl crossplane build configuration --ignore=examples/example-bucket.yaml
    
    # use XRD to create PostgreSQL instance
    kubectl apply -f xrd/postgresql/definition.yaml
    kubectl apply -f xrd/postgresql/composition.yaml
    kubectl apply -f xrd/postgresql/examples/example-db.yaml
    
    kubectl get postgresqlinstances.db.aws.qaware.de example-db
    kubectl get claim
    
    kubectl get secrets
    kubectl describe secret example-db-conn
    
    kubectl apply -f xrd/postgresql/examples/example-db-client.yaml
    kubectl get pods
    kubectl logs example-db-client-sjdh7
    
    cd xrd/postgresql/
    kubectl crossplane build configuration --ignore=examples/example-db.yaml,examples/example-db-client.yaml

    GCP Provider

    For examples of the GCP provider have a look the Github repository

    # we need to create a GCP service account and secret
    gcloud iam service-accounts create crossplane-system --display-name=Crossplane
    gcloud projects add-iam-policy-binding cloud-native-experience-lab --role=roles/iam.serviceAccountUser --member serviceAccount:crossplane-system@cloud-native-experience-lab.iam.gserviceaccount.com
    gcloud projects add-iam-policy-binding cloud-native-experience-lab --role=roles/storage.admin --member serviceAccount:crossplane-system@cloud-native-experience-lab.iam.gserviceaccount.com
    
    gcloud iam service-accounts keys create gcp-credentials.json --iam-account crossplane-system@cloud-native-experience-lab.iam.gserviceaccount.com
    
    kubectl create secret generic gcp-credentials -n crossplane-system --from-file=credentials=./gcp-credentials.json
    
    # we could manually installe the AWS provider
    # kubectl crossplane install provider crossplane/provider-gcp:v0.21.0
    
    cd crossplane/gcp/
    kubectl apply -n crossplane-system -f provider.yaml
    kubectl apply -n crossplane-system -f providerconfig.yaml
    
    # create an storage bucket in eu-central-1
    kubectl apply -f storage/bucket.yaml
    gsutil ls

    Maintainer

    M.-Leander Reimer (@lreimer), mario-leander.reimer@qaware.de

    License

    This software is provided under the MIT open source license, read the LICENSE
    file for details.

    Visit original content creator repository
    https://github.com/lreimer/mastering-gitops

  • undockerizer

    Undockerizer

    Undockerizer is a tool that helps to create an installer (script) from a Docker image.

    Source

    Issue tracker:

    Usage:

    Please note that interactive mode and compressed mode (tar.gz) are the suggested modes of use.

    Command line parameters:

    Usage: Undockerizer [-cftv] [-de] [-fp] [-it] -i=<image> [-o=<outputfileStr>]
                        [-od=<outputDirPathStr>] [-sp=<shellPathStr>]
      -c, --cleanAll         Clean all temp data
          -de, --disableEscaping
                             Disable escaping of variables
                               Default: false
      -f, --force            Overwrite output file if exists
          -fp, --forcePull   Force to pull image.
                               Default: false
      -i, --image=<image>    The docker image.
          -it, --interactiveOutput
                             Generate output file with interactive mode
      -o, --output=<outputfileStr>
                             The output file name.
                               Default: null
          -od, --outputDir=<outputDirPathStr>
                             Sets the output directory path.
                               Default: undockerizer
          -sp, --shellPath=<shellPathStr>
                             Sets the shell path.
                               Default: /bin/sh
      -t, --tar              Create tar file.
                               Default: false
      -v, --verbose          Verbose mode.
    

    Run with JDK

    Prerequisites:

    • JDK and Docker is required.

    Command line:

    java -jar ./target/undockerizer.jar [PARAMETERS]
    

    Run native

    Prerequisites:

    • Docker is required.

    Command line:

    undockerizer-centos [PARAMETERS]
    

    or

    undockerizer-ubuntu [PARAMETERS]
    

    How to Try an undockerizer script?

    Prerequisites:

    • Docker is not required
    • Sudo is required

    Command line:

    1. Run a docker image with same base than your undockerized image (e.g. Centos 7) and mount your undockerizer tar.gz file (or your undockerizer target folder). For example.
    docker run -it -v ${WORKDIR}\undockerizer\undockerizer\:/home/undockerizer centos:7 /bin/bash
    
    1. Untar file:

    cd /home/undockerizer
    tar -xvz $UNDOCKERIZER_FILE.tar.gz
    
    1. Add execution attribute:
    chmod +x $UNDOCKERIZER_FILE.sh
    
    1. Install sudo:
    yum install sudo -y
    
    1. Run:
    ./$UNDOCKERIZER_FILE.sh
    

    Build

    System Requirements

    1. Java Jdk 8 or later
    2. Maven 3.6.3 or later
    3. optional: Graalvm 20.1.0 or later
    4. Docker 19 or later
    5. Checkout project

    Build jar:

    Command line:

    mvn clean install
    

    Build native image:

    Command line:

    1. run:
    cd docker-graalvm
    
    1. select centos, ubuntu or your custom image:
    cd centos
    
    1. run once:
    docker-build.bat
    
    1. compile a native image release:
    docker-compile.bat
    

    Note

    Please note that this project is experimental and is offered without any guarantees or liability. Please note review the generated script and do not make illegal use of the tool or code.

    Visit original content creator repository
    https://github.com/undockerizer/undockerizer

  • azure-func-go-java

    Azure Functions with Go / Java Spring

    This repo contains some sample code experimenting with the new http worker coming in Azure Functions. More details and samples for this feature can be found at Pragna Gopa’s repo here.

    Structure

    Essentially, this repo contains 2 simple, dirty, identical APIs: One written in Go and the other in Java. With the new http worker feature, we can spin up our own process along with the functions runtime, and functions will simply marshall requests from triggers + bindings to our own http endpoints.

    There is no ‘function code’ – just json triggers and bindings, which point at our own HTTP endpoints which are not aware of functions.

    To Run

    • Make sure you’ve got functions core tools installed and up to date -> docs.
    • Clone this repo
    • Update the values in local.settings.json to point at your own storage accounts / cosmos etc as needed

    Using the Go API

    • Build the Go API:
    go build ./go/go-http-server
    
    • Rename the host-go.json to host.json

    Using the Java API

    • Package the Java API. Using Maven:
    mvn package -f "com.damoo/pom.xml"
    
    • Rename the host-java.json to host.json
      • Ensure the path to java is correct for your environment. Just 'java' should work given it’s on your PATH.

    Run it…

    • Run the functions host:
    func start
    
    • Hit the endpoints in Postman / your api testing tool. For the add endpoint, use the following json schema:

    {
    	"id": 1,
    	"name": "bananas"
    }

    Operations:

    • /api/add: POST the above schema
    • /api/get?id=1: GET an item
    • /api/list: GET all items
    • /api/send-items: GET. Send all items to a storage queue
    • process-items (non-http): Trigger on queue and post to cosmos and secondary queue

    Use the container

    It’s also possible – and in this case probably desirable – to containerise your functions. This can help smooth the deployment too. The Dockerfile found in this repo uses the standard node image for functions, and installs Java 11 into it.

    Build:

    docker build -t myregistry.azurecr.io/javafunc:1 .

    Push:

    docker push myregistry.azurecr.io/javafunc:1

    Wire up:

    Create a new function app and select Container as the runtime – follow the wizard to point it to your pushed container in your registry. More found here.

    Disclaimer

    All code is sample, ugly, and likely to break 🙂

    Visit original content creator repository
    https://github.com/damoodamoo/azure-func-go-java

  • stripe-ruby-webhook-receipts

    Custom Stripe subscription email receipts with Mailgun

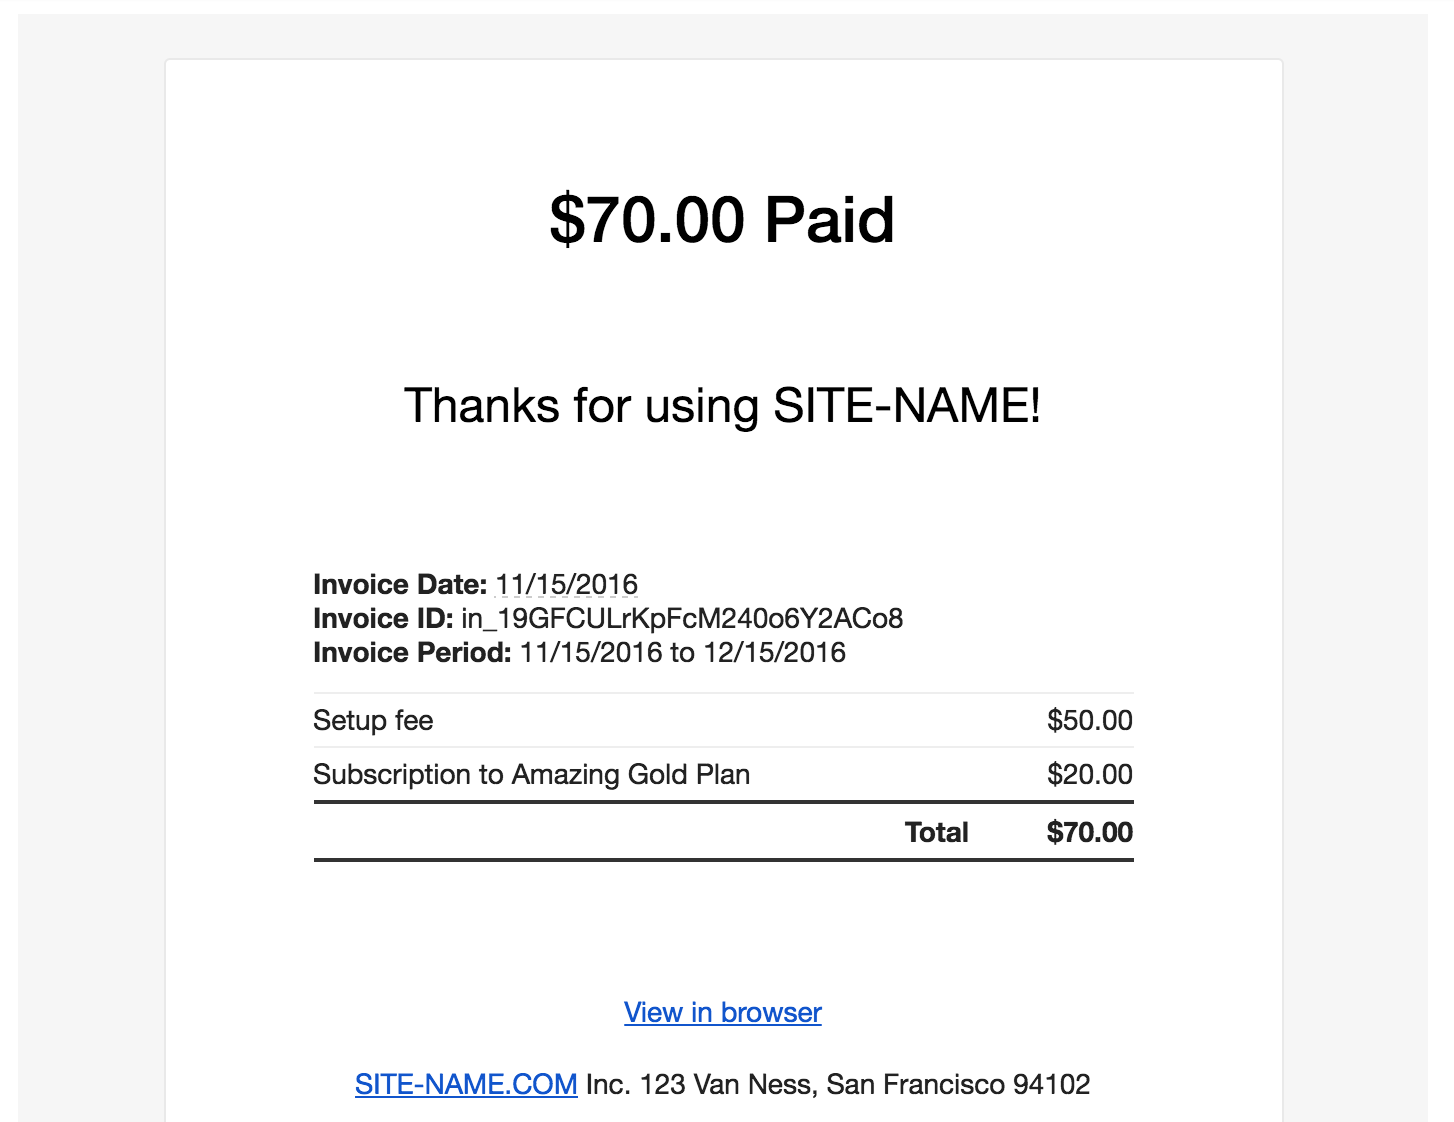
    A basic example app built with Sinatra that uses Stripe’s webhook functionality and the Mailgun Ruby gem to send custom email receipts to customers when the invoice.payment_succeeded event is received.

    Modify the webhook.rb script and deploy this on Heroku or another service to send email receipts to your Stripe customers.

    Example receipt

    Features

    • Uses Mailgun’s responsive email templates for invoices to send nicely formatted receipts.
    • HTML receipts include each invoice line item and totals. If you pass descriptions when creating invoice items, they’ll each be listed here.
    • Sends both text and HTML emails for clients that don’t support HTML.

    Getting started

    Create and configure a Mailgun account to send emails from your domain. You can also just test for free and use their sandbox domain until you’re ready to configure your own.

    Clone this repository:

    git clone https://github.com/adamjstevenson/stripe-webhook-receipts.git
    

    Run bundle install

    Modify webhook.rb and views/html_email.erb to add your own domain and site name in place of SITE-NAME and YOUR-DOMAIN.COM

    Obtain your API keys from your Stripe dashboard and Mailgun settings. Set these as environment variables when running this app.

    Testing

    You can test this locally and run on your machine by passing in the STRIPE_KEY and MAILGUN_KEY env variables:

    STRIPE_KEY='sk_test_YOUR-STRIPE-KEY' MAILGUN_KEY='key-YOUR-MAILGUN-KEY' ruby webhook.rb
    

    Once this is running locally, you can use a service like Ngrok to make the endpoint accessible at a URL like https://abcd1234.ngrok.io/webhook, then add the webhook endpoint in the Stripe dashboard.

    You can find test cards on Stripe to create test customers and subscriptions.

    Other notes

    By default webhook.rb looks for an email address on the customer object. Be sure to either create customer objects with an email property or modify this to retrieve the email address from somewhere else.

    Visit original content creator repository https://github.com/adamjstevenson/stripe-ruby-webhook-receipts
  • uc300-payload-utils

    UC300 Milesight Decoder and Encoder

    This Java library provides classes for decoding and encoding data from the UC300 Milesight controllers. The project structure is as follows:

    |-----decoder
    |             |--------UC300Data
    |             |--------UC300Decoder
    |-----encoder
                  |--------UC300DigitalOutputs
                  |--------UC300Encoder
    

    Decoder

    UC300Data

    This class contains the data fields that store the information received from the UC300 controller. The fields include:

    • Digital Inputs
    • Digital Outputs
    • Pulse Counters
    • Analog Inputs

    UC300Decoder

    This abstract class provides a method decode(byte[] bytes) that decodes the raw data received from the UC300 controller into a UC300Data object.

    Encoder

    UC300DigitalOutputs

    This class represents the digital outputs of the UC300 controller. It contains the following fields:

    • DO1 Value
    • DO2 Value

    UC300Encoder

    This abstract class provides methods for encoding control and configuration payloads to be sent to the UC300 controller. The methods include:

    • encodeControlPayload(UC300DigitalOutputs outputs)
    • encodeReportingIntervalPayload(Integer seconds)
    • encodeRebootDevicePayload()

    Example

    // Example byte array received from the UC300 controller
    byte[] rawData = ...;
    
    // Decoding the raw data
    UC300Data data = UC300Decoder.decode(rawData);
    
    // Accessing the decoded data
    System.out.println("Digital Inputs: " + data.getDigitalInputs());
    System.out.println("Digital Outputs: " + data.getDigitalOutputs());
    System.out.println("Pulse Counters: " + data.getPulseCounters());
    System.out.println("Analog Inputs: " + data.getAnalogInputs());
    
    // Creating a UC300DigitalOutputs object to control the digital outputs
    UC300DigitalOutputs outputs = new UC300DigitalOutputs();
    outputs.setDO01Value(true); // Setting DO1 to HIGH
    outputs.setDO02Value(false); // Setting DO2 to LOW
    
    // Encoding the control payload
    byte[] controlPayload = UC300Encoder.encodeControlPayload(outputs);
    
    // Sending the control payload to the UC300 controller
    // ...

    Visit original content creator repository
    https://github.com/juanmatola/uc300-payload-utils

  • php-vips

    PHP binding for libvips

    CI

    php-vips is a binding for libvips 8.7 and later that runs on PHP 7.4 and later.

    libvips is fast and needs little memory. The vips-php-bench repository tests php-vips against imagick and gd. On that test, and on my laptop, php-vips is around four times faster than imagick and needs 10 times less memory.

    Programs that use libvips don’t manipulate images directly, instead they create pipelines of image processing operations starting from a source image. When the pipe is connected to a destination, the whole pipeline executes at once and in parallel, streaming the image from source to destination in a set of small fragments.

    Install

    You need to install the libvips library. It’s in the linux package managers, homebrew and MacPorts, and there are Windows binaries on the vips website. For example, on Debian:

    sudo apt-get install --no-install-recommends libvips42
    

    (--no-install-recommends stops Debian installing a lot of extra packages)

    Or macOS:

    brew install vips
    

    You’ll need to enable FFI in your PHP, then add vips to your composer.json:

    "require": {
        "jcupitt/vips" : "2.4.0"
    }
    

    php-vips does not yet support preloading, so you need to enable FFI globally. This has some security implications, since anyone who can run php on your server can use it to call any native library they have access to.

    Of course if attackers are running their own PHP code on your webserver you are probably already toast, unfortunately.

    Finally, on php 8.3 and later you need to disable stack overflow tests. php-vips executes FFI callbacks off the main thread and this confuses those checks, at least in php 8.3.0.

    Add:

    zend.max_allowed_stack_size=-1
    

    To your php.ini.

    Example

    #!/usr/bin/env php
    <?php
    require __DIR__ . '/vendor/autoload.php';
    use Jcupitt\Vips;
    
    // handy for Windows
    Vips\FFI::addLibraryPath("C:/vips-dev-8.16/bin");
    
    // check libvips version
    echo 'libvips version: ' . Vips\Config::version() . PHP_EOL;
    
    // fast thumbnail generator
    $image = Vips\Image::thumbnail('somefile.jpg', 128);
    $image->writeToFile('tiny.jpg');
    
    // load an image, get fields, process, save
    $image = Vips\Image::newFromFile($argv[1]);
    echo "width = $image->width\n";
    $image = $image->invert();
    $image->writeToFile($argv[2]);

    Run with:

    $ composer install
    $ ./try1.php ~/pics/k2.jpg x.tif
    

    See examples/. We have a complete set of formatted API docs.

    How it works

    php-vips uses php-ffi to call directly into the libvips binary. It introspects the library binary and presents the methods it finds as members of the Image class.

    This means that the API you see depends on the version of libvips that php-vips finds at runtime, and not on php-vips. php-vips documentation assumes you are using the latest stable version of the libvips library.

    The previous php-vips version that relied on a binary extension and not on php-ffi is still available and supported in the 1.x branch.

    Introduction to the API

    Almost all methods return a new image as the result, so you can chain them. For example:

    $new_image = $image->more(12)->ifthenelse(255, $image);

    will make a mask of pixels greater than 12, then use the mask to set pixels to either 255 or the original image.

    Note that libvips operators always make new images, they don’t modify existing images, so after the line above, $image is unchanged.

    You can use long, double, array and image as parameters. For example:

    $image = $image->add(2);

    to add two to every band element, or:

    $image = $image->add([1, 2, 3]);

    to add 1 to the first band, 2 to the second and 3 to the third. Or:

    $image = $image->add($image2);

    to add two images. Or:

    $image = $image->add([[1, 2, 3], [4, 5, 6]]);

    To make a 3 x 2 image from the array, then add that image to the original.

    Almost all methods can take an extra final argument: an array of options. For example:

    $image->writeToFile("fred.jpg", ["Q" => 90]);

    php-vips comes with API docs. To regenerate these from your sources, type:

    $ vendor/bin/phpdoc
    

    And look in docs/.

    Unfortunatly, due to php-doc limitations, these do not list every option to every operation. For a full API description you need to see the main libvips documentation:

    https://libvips.org/API/current

    Test and install

    $ composer install
    $ composer test
    $ vendor/bin/phpdoc
    

    Regenerate auto docs

    $ cd src
    $ ../examples/generate_phpdoc.py
    
    Visit original content creator repository https://github.com/libvips/php-vips
  • tinyplural

    ✍ tinyplural

    bundlephobia npm version Run Jest Tests CodeQL

    A tiny pluralizer for English nouns

    tinyplural is an easy to use utility function that converts your strings into their relevant plurals dynamically. Comes with 0 dependencies.

    Demo

    import tinyplural from 'tinyplural';
    
    const formattedDate = tinyplural('day', 2);
    
    return (
      <>
        <p>Next payment due in {formattedDate}</p>
      </>
    );
    
    // => Next payment due in 2 days

    It’s fully written in TypeScript, with a test-suite to go with it.

    The library is available as an npm package. To install the package run:

    npm install tinyplural --save
    # or with yarn
    yarn add tinyplural
    

    Want to get involved! Read our Contributors’ Guide for details.

    Found a bug or a rule that doesn’t work? Open a bug report ticket.

    Got a feature to add? Fork the repo, add your changes, and make a pull request.

    Info

    Say you need to present a promocode that ends in a number of days. Using tinyplural, you can just give the singular noun and the value and it will return the correct plural version.

    Noun Plural
    day days
    hero heroes
    goose geese
    fish fish

    Resources

    These are some good guides explaining the rules behind plural nouns in English:

    Visit original content creator repository https://github.com/kwaimind/tinyplural
  • Cripto-Price–dashboard

    Cover Image

    Netlify Status License: MIT React Status: Demonstration Developed by Deco31416

    Cripto Price App

    is a web-based demonstration project developed by Deco31416 to showcase real-time cryptocurrency conversion using the CryptoCompare API.

    🔹 Key Features:

    • Real-time cryptocurrency conversion.
    • Modern, responsive, and user-friendly interface.
    • Built using React 19, Emotion Styled Components, and Axios.
    • Well-structured and modular codebase for maintainability.

    Note:
    This application is for demonstration purposes only and should not be used for financial transactions or investment decisions.

    🌎 2. Live Demo

    🔗 Try the App Here 🚀

    💰 3. Supported Currencies

    Euro (€)
    Dollar ($)
    Pound (£)
    Mexican Peso ($)
    Colombian Peros ($)
    

    🔗 3.1 API Used

    https://min-api.cryptocompare.com
    

    🛠 4. Technologies Used

    Technology Version Description
    React 19.0.0 Core UI Library
    Emotion Styled 11.14.0 CSS-in-JS styling solution
    Emotion React 11.14.0 Core styling engine for Emotion
    Axios 1.8.2 HTTP client for API requests
    Lucide React 0.479.0 Optimized icon library for React

    🖥 5. Installation & Usage

    5.1 Prerequisites

    Before starting, ensure you have installed:

    5.2 Installation Steps

    🔹 1️⃣ Clone the Repository

    git clone https://github.com/.git
    cd cripto-price

    🔹 2️⃣ Install Dependencies

    npm install

    🔹 3️⃣ Run in Development Mode

    npm start
    • The app will be available at http://localhost:3000 🚀

    🔹 4️⃣ Build for Production

    npm run build
    • Generates optimized production-ready files.

    ⚖️ 6. License

    This project is licensed under the MIT License.
    🔗 View License

    ✨ 7. Developed by

    👨‍💻 Deco31416

    📢 If you find this project useful, ⭐ give it a star on GitHub and share it. 🚀😃

    Visit original content creator repository https://github.com/deco31416/cripto-price–dashboard
  • JP-SysML-Connector-Simple-Workflow

    JPSysMLConnectorSimpleWorkflow

    Open in MATLAB Online

    Let’s try importing XMI (XML Metadata Interchange) files into System Composer ™, a MathWorks tool that can describe architecture models.

    ※本リポジトリのファイルをダウンロードしたい場合はView <File Exchange Title> on File Exchangeからのダウンロードをお試しください。

    MathWorks Products (https://www.mathworks.com)

    Requires MATLAB release R2024a Update 2 or newer

    Introduction (English)

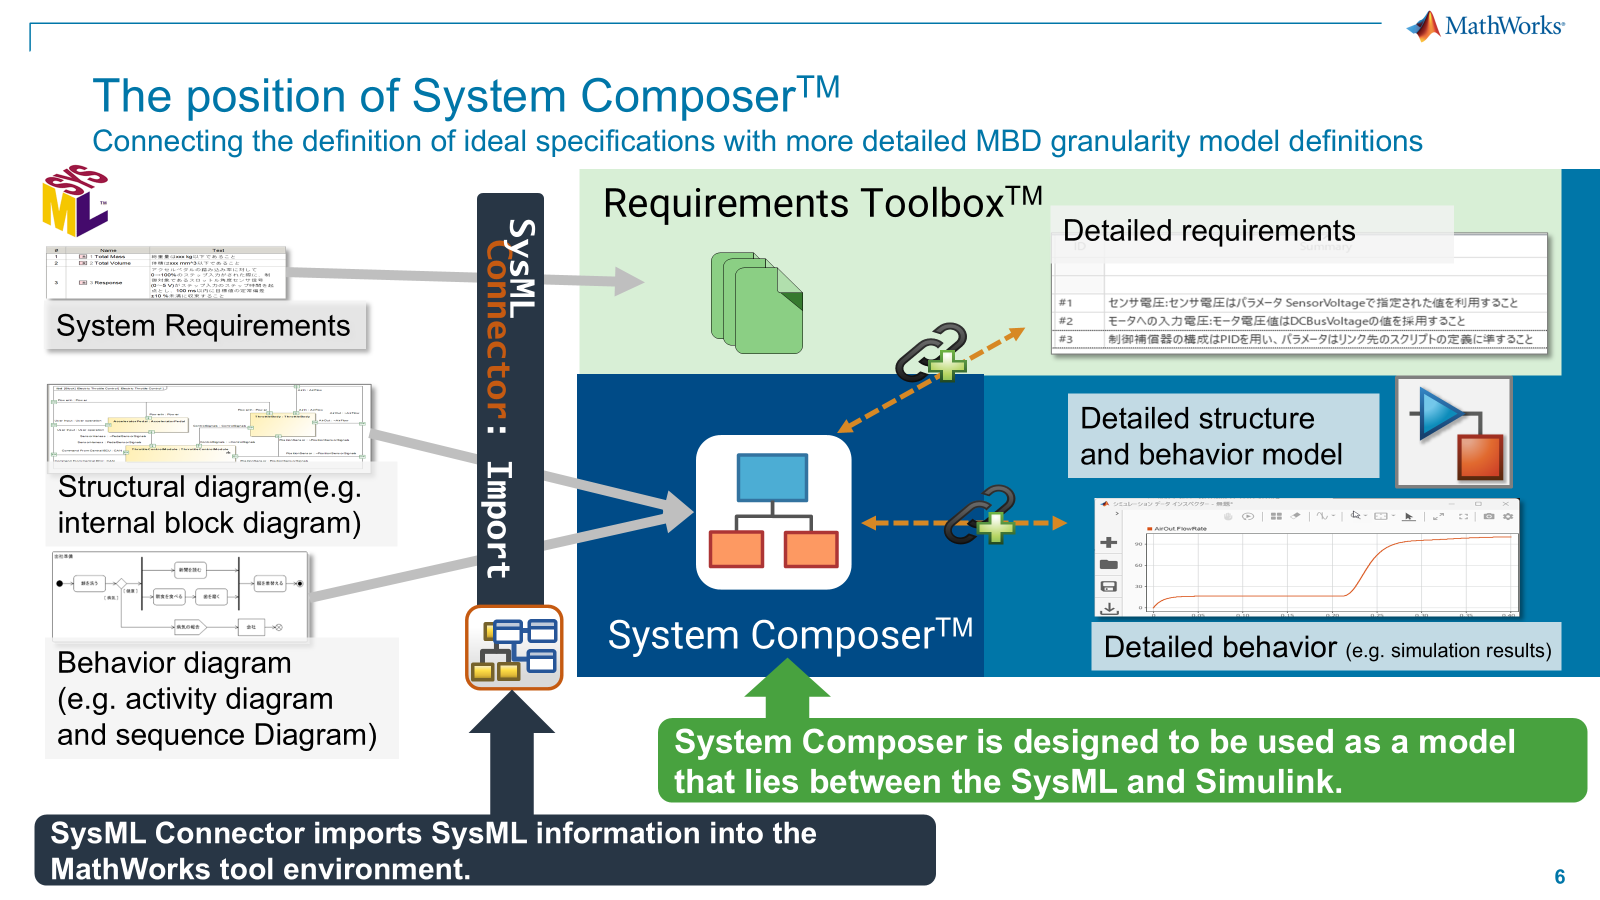
    Image

    This sample shows how to import XMI(XML Metadata Interchang) information into the MathWorks environment and connect it to the simulation environment.

    • The data of System Model imported as System Composer ™ Model that suport to define Architecture model like as Internal Block Diagram.

    • The data of Requirements imported as Requirements Toolbox ™ file(.slreqx).

    In this example, the SysML Connector is used as a support package. https://jp.mathworks.com/products/sysml.html

    The SysML Connector package supports SysML1.x. MathWorks plans to support the Object Management Group’s® SysML v2 standard. Current users of System Composer can map many capabilities directly to equivalent concepts in SysML v2.

    You can check the correspondence between the XMI model definitions and the MathWorks tool models in the SysML Connector Help Page.

    Introduction (Japanese)

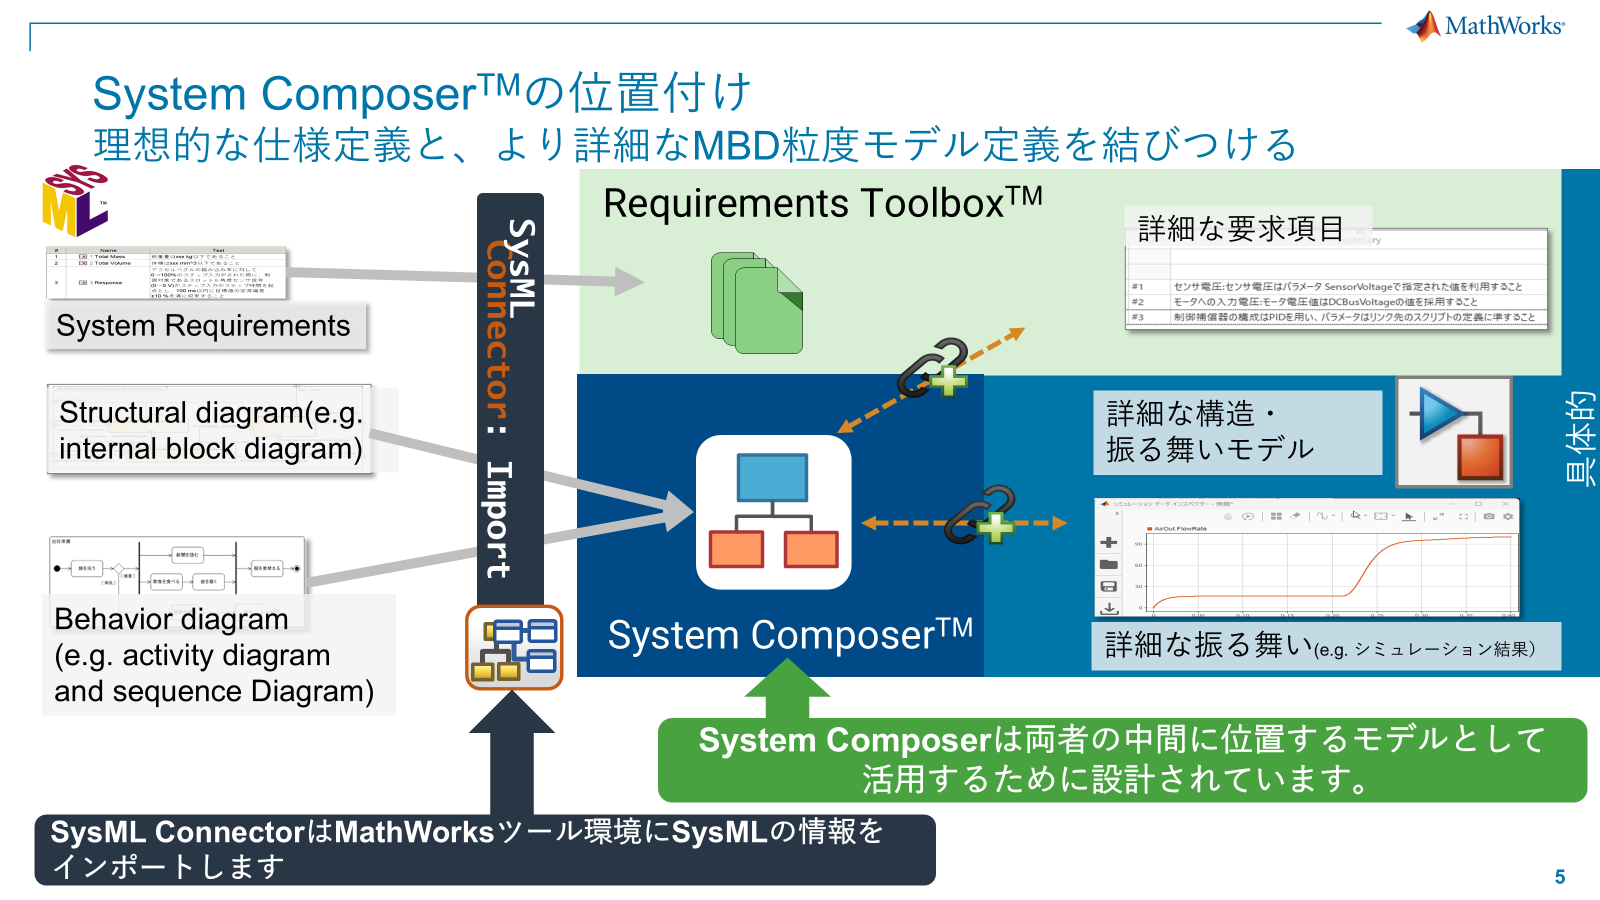
    Image

    このサンプルはMathWorks環境にXMIのモデル情報をインポートし、シミュレーション環境につなげる例を示すものです。

    • システムモデルのデータをSystem Composer™ モデルとしてインポートし、内部ブロック図のようなアーキテクチャモデルを定義できるようにします。
    • 要件のデータをRequirements Toolbox™ ファイル(.slreqx)としてインポートします。

    この例ではサポートパッケージとしてSys ML Connectorを利用します。 https://jp.mathworks.com/products/sysml.html

    SysML ConnectorパッケージはSysML1.xをサポートしています。MathWorksは、Object Management Group®のSysML v2標準のサポートを計画しています。System Composerの現行ユーザーは、SysML v2の同等の概念に多くの機能を直接マッピングすることができます。

    XMIモデル定義とMathWorksツールモデルの対応については、SysML Connectorヘルプページで確認できます。

    Getting Started (English)

    • Case1: If you want try import from XMI:
    1. Install SysML Connector : https://jp.mathworks.com/products/sysml.html
    2. Start MATLAB
    3. Select Sys ML Connector from the App
    4. Click import
    5. Select Source SysML Models (/SystemModels /ElectricThrottleControlSysMLModel.xml or /SystemModels/ElectricThrottleControlSysMLModel.mdzip)
    6. Select Output Derectory
    7. Click ”Import”
    • Case2: If you want to run a model that is already linked to Simulink and can be simulated:
    1. Open SysMLArchModel/SysMLArchModel.prj
    2. Open ElectricThrottleControl.slx
    3. Run Simulation.
    • Case 3: You want to run a simulation from a test case defined in Simulink Test:
    1. open SysMLArchModel/SysMLArchModel.prj Open TestFile/TestManagerFile.mldatx in the project 3.
    2. select a test case from the test browser  TestmanagerFile->Response Performance Test->Step Response Test
    3. Right-click on the test case “Step Response Test” and select “Run
    4. The screen changes to “Results and Artifacts” and the simulation based on the test case is executed.

    Getting Started (Japanese)

    • Case1: XMIからのインポートを試したい場合:
    1. SysMLコネクタをインストール:
    2. MATLABを起動
    3. アプリケーションからSys MLコネクタを選択
    4. インポートをクリック
    5. ソースSysMLモデルを選択(/SystemModels/ElectricThrottleControlSysMLModel.xmlまたは/SystemModels/ElectricThrottleControlSysMLModel.mdzip
    6. 出力ディレクトリを選択
    7. 「インポート」をクリック
    • Case2: すでにSimulinkと連携してシミュレーション可能になったモデルを実行してみたい場合:
    1. SysMLArchModel/SysMLArchModel.prjを開く
    2. ElectricThrottleControl.slxを開く
    3. シミュレーションを実行する。
    • Case3: Simulink Testで定義したテストケースからシミュレーションを実行したい場合:
    1. SysMLArchModel/SysMLArchModel.prjを開く
    2. プロジェクト内のTestFile/TestManagerFile.mldatxを開く
    3. テストブラウザーからテストケースを選択する  TestmanagerFile->応答性能テストー>ステップ応答テスト 4.テストケース「ステップ応答テスト」を右クリックし、「実行」を選択 5.画面が「結果とアーティファクト」に切り替わり、テストケースに基づくシミュレーションが実行される  

    License

    The license is available in the License.txt file in this GitHub repository.

    Community Support

    MATLAB Central

    Copyright 2024 The MathWorks, Inc.

    Visit original content creator repository https://github.com/mathworks/JP-SysML-Connector-Simple-Workflow