A Layer of Abstraction over Encryption Algorithms which allows easy generation of Hashes from Strings and Comparison of Passwords to Hashes.
This Module basically contains Multiple Encryption Algorithms which you can then use directly with a single helper Function which Returns a Promise Object that contains either your hash or an error message. The API is pretty simple with just 1 Method that allows easy switching between algorithms and the CLI allows you to encrypt stuff easily often without writing code.
Supported Algorithms
Bcrypt
Sha256
Sha512
MD5
Cli Example
npm i --global passwordjs
encrypt
| _ \ __ _ ___ _____ _____ _ __ __||| / ___|||_) / _` / __/ __\ \ /\ / / _ \|'__/ _` |_ | \___ \ | __/ (_| \__ \__ \\ V V / (_) | | | (_| | |_| |___) | |_| \__,_|___/___/ \_/\_/ \___/|_| \__,_|\___/|____/? Enter The String to Be Encrypted gg? Choose The Algorithm to encrypt with. bcrypt $2a$10$GzbDoVx64TCpqwMQDK1dA.x.veGVvZLGKON10zdBW690gpOxDuPwe
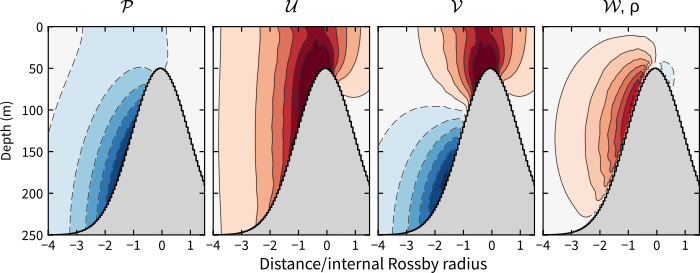
The distance between steps should ideally be a small fraction of the internal Rossby radius
For omega very close to 1 (i.e., greater than 0.95), plots of U and V will be noisy.
The internal Rossby radius for the problem is calculated from the leftmost depth. Therefore, the left side of the ridge should be equal to or deeper than the seafloor on the right side of the ridge.
Code may or may not work when negative latitudes are used. Just use positive ones.
The main eigenvalue problem involves M × M matrices, where M is 2 × number of modes × number of steps. Hence, when the number of steps gets large (> 50), calculating the solution may take several minutes.
The coastal problem (i.e., where depth goes to zero) has undergone only limited testing.
If the solution doesn’t clearly converge, try a different value for lambda_guess
This project has reached End-Of-Life (EOL) and is no longer maintained.
The RemoteConnection addon can be used with Vaadin or GWT to establish a WebRTC communication channel between two browsers without needed to communicate with the server. WebRTC is currently supported both by the latest stable Chrome and Firefox versions. Even if it should work cross browser I have found that currently doing WebRTC between Chrome and Firefox will not work reliably and using the current version of the addon is only recommended between the same browsers.
The addon uses Peer.js (http://www.peerjs.com) as the underlaying technology for establishing the WebRTC connections and a default PeerServer Cloud service (http://peerjs.com/peerserver) as the signalling server.
Usage
To use the addon in your application you will need to include the addon jar in your project. This can be done by either copying the addon jar into your WEB-INF/lib directory or using a dependency management system like Gradle or Maven to include the addon as a dependency.
If you are building a Vaadin application you will need to recompile the widgetset after you have added the addon jar since the addon contains client side code. If you are using GWT then you need to inherit the fi.jasoft.remoteconnection.RemoteConnectionWidgetset in your applications module xml.
The API for the addon is almost identical wheather you are working with GWT or with Vaadin. In Vaadin the RemoteConnection is an UI Extension which means you will always attach it to the users UI. In GWT it is just an object you invoke.
Lets take a look at the different steps needed for establishing a connection in your application.
The first thing you need to in your application to establish a connection between two endpoints is connect to a signalling server shared by all application clients. The signalling server is the means to how the two endpoints will find eachother. Here you can use the Peer.js provided cloud server, or use your own. By default the addon will use a development server on the Peer.js cloud for demo purposes and to get you started. But it has a very limited amount of connections and you should definitly either create your own peer.js cloud server account (free) or download their server from github and run it locally (more secure when the application is used in an intranet for instance). Here is the code to get the client connected to the peer server:
Vaadin (inside UI.init() for example ):
// Get a connection instanceRemoteConnectionpeer = ServerRemoteConnection.register(UI.getCurrent());
// Make the connection to the signalling serverpeer.connect();
GWT:
// Get a connection instanceRemoteConnectionpeer = ClientRemoteConnection.register();
// Make the connection to the signalling serverpeer.connect();
That is all what is neede to get started. It will establish a connection with the signalling server and return a connection you can use to connect to other clients on the same peer server. Each client will recieve a unique id from the signalling server which is used to identify the client with when establishing a channel between two clients on the signalling server. Lets next take a look at how we can establish the connection. The same code from this point forward can both be used in Vaadin as well as in GWT.
Lets assume we already know that another client is running somewhere on the internet connected to the signalling server and has recieved the following id ‘xyz’. Now, to make a connection to that client we do the following:
// Create a channel to another peerRemoteChannelchannel = peer.openChannel("xyz");
// Listen for connectionpeer.addConnectedListener(newConnectedListener() {
@Overridepublicvoidconnected(Stringid) {
System.out.println("Connected to "+id);
}
});
That code with set up a bi-directional channel between my connection and another connection. When the connection is established the RemoteConnection instance will recieve a notification that a new channel has been established.
Okay, we now can establish a connection which is nice because now we can start sending messages using the established channel. To do so we do the following:
// Send a message thought the channel to 'zyx'channel.send("Hello world");
// Or we can broadcast to all connected channels withpeer.broadcast("Hello all the connected peers!");
That is how we can send messages though the channel. We can either send a message to a specific channel or broadcast on all the channels.
But sending messages is only half the part of communication, we also need to be able to recieve messages. For that we need to listen for them.
// Listen for messagespeer.addDataListener(newRemoteConnectionDataListener() {
@OverridepublicvoiddataRecieved(RemoteChannelchannel, Stringdata) {
System.out.println("Recieved message from "+channel.getId()+": "+data);
}
});
By attaching the data listener we recieve an event whenever a message arrives on a channel. We recieve the channel on which the message came as the message data itself.
That is what is needed for the most basic kind of application. There are a lot of options you could use to tweak the experience. Now go make your own chat application! That is what I did 🙂
Ward is a secure, cross-platform, zero-install, single-file password manager.
Ward stores your passwords in an encrypted file which you manage with a single master password. You can keep track of multiple complex passwords without having to remember any of them.
go get -u github.com/schmich/ward/... && go install github.com/schmich/ward/...
Usage
Usage: ward [OPTIONS] COMMAND [arg...]

Secure password manager - https://github.com/schmich/ward

Options:
  -v, --version    Show the version and exit

Commands:
  init         Create a new credential database.
  add          Add a new credential.
  copy         Copy a password to the clipboard.
  edit         Edit an existing credential.
  del          Delete a stored credential.
  qr           Print password formatted as a QR code.
  import       Import JSON-formatted credentials.
  export       Export JSON-formatted credentials.
  list         Print a table-formatted list of credentials.
  master       Update master password.

Run 'ward COMMAND --help' for more information on a command.
Create a new credential database:
> ward init
Creating new credential database.
Master password:
Master password (confirm):
✓ Credential database created at C:\Users\schmich\.ward.
Link to an existing credential database. This requires administrator privileges on Windows. A symlink will be created to the specified file:
The Ward database is stored at ~/.ward. This can be overridden with the WARDFILE environment variable, e.g. in .bashrc:
export WARDFILE=~/dotfiles/ward
Password Generator
Ward comes with a constraint-solving password generator that you can use when adding a new credential (ward add --gen). You can control length, character requirements, and exclusions:
> ward add --help

Usage: ward add [--login] [--realm] [--note] [--no-copy] [--gen [--length] [--min-length] [--max-length] [--no-upper] [--no-lower] [--no-digit] [--no-symbol] [--no-similar] [--min-upper] [--max-upper] [--min-lower] [--max-lower] [--min-digit] [--max-digit] [--min-symbol] [--max-symbol] [--exclude]]

Options:
  --login=""           Login for credential, e.g. username or email.
  --realm=""           Realm for credential, e.g. website or WiFi AP name.
  --note=""            Note for credential.
  --no-copy=false      Do not copy password to the clipboard.
  --gen=false          Generate a password.
  --length=0           Password length.
  --min-length=30      Minimum length password.
  --max-length=40      Maximum length password.
  --no-upper=false     Exclude uppercase characters from password.
  --no-lower=false     Exclude lowercase characters from password.
  --no-digit=false     Exclude digit characters from password.
  --no-symbol=false    Exclude symbol characters from password.
  --no-similar=false   Exclude similar characters from password: 5SB8|1IiLl0Oo.
  --min-upper=0        Minimum number of uppercase characters in password.
  --max-upper=-1       Maximum number of uppercase characters in password.
  --min-lower=0        Minimum number of lowercase characters in password.
  --max-lower=-1       Maximum number of lowercase characters in password.
  --min-digit=0        Minimum number of digit characters in password.
  --max-digit=-1       Maximum number of digit characters in password.
  --min-symbol=0       Minimum number of symbol characters in password.
  --max-symbol=-1      Maximum number of symbol characters in password.
  --exclude=""         Exclude specific characters from password.
Yasen-Baka, a multifunctional Discord bot
with special World of Warships commands., written with the discord.py api.
You can invite the bot to your guild with this link
Notice
I no longer use discord for personal reasons. I will try to fix bugs as they come up but as of this momnet I do not plan on adding any new features.
If you are interested in continuing this project please shoot me an email at mat1g3r at gmail dot com.
Usage
To get started with the bot, simply type ?help into your guild channel.
Commands are divided into 9 categories, they are listed below.
In addition, you will need to execute the following command to install required libraries:
First cd into the directory where yasen is located, then:
pip install -Ur requirements.txt
Make a copy of YasenBaka/data/sample_db in the YasenBaka/data/ directory and rename it to yasen_db
Make a copy of YasenBaka/config/sample_config.json in the YasenBaka/config/ directory and rename it to config.json. Then you will need to fill out the required config values and api keys. I am not responsible for helping you obtaining any of the api keys.
Finally to run, do:
python3 yasen-baka.py
Contributing
For non-developers, you can contribute by reporting bugs or making suggestions.
Simply open a Github issue here
For developers, if you are interested in contributing, follow the steps below:
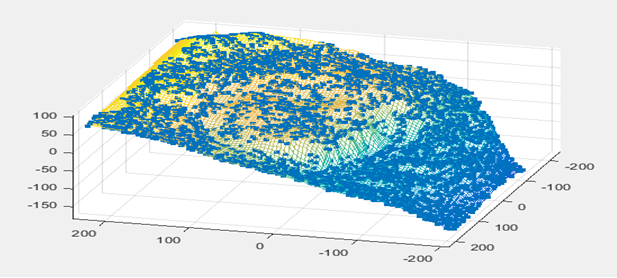
Project implements shape and motion from image stream using factorization method
Getting Started
This project implements factorization method for estimation of object shape and camera motion from image stream.
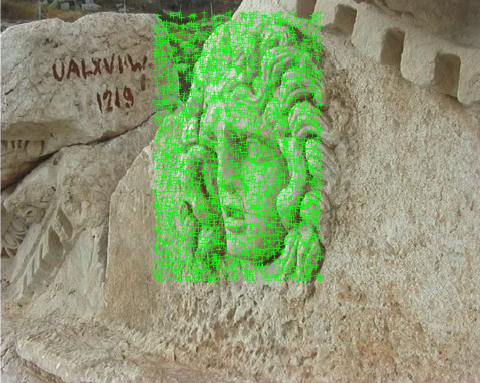
Factorization method relies on good feature selection and tracking algorithm. In this we use minimum eigen values as feature,
KLT feature tracker on medusa image sequence.
Framework used
Matlab
Implementation
We track P points through F frames of images, which is used to build 2FxP matrix called measurement matrix (W).
The rotation and translation are measured w.r.t centroid of the object which enables the application of rank theorem []
The rotation matrix is defined by: 1) Rotation (R) of dimensions: 2Fx3 and 2) Translation (T) of dimensions: 3xP
We apply factorization method by computing SVD decomposition to estimate the rotation and translation matrix.
We use orthographic projection as assumptions for solving for matrix Q. For more details about the algorithms available in the paper [1]
Medusa Image Sequence
Feature Tracking (KLT)
Structure from Motion (SfM)
References
[1] C. Tomasi and T. Kanade, “Shape and motion from image streams under orthography– a
factorization method,” International Journal of Computer Vision, 9(2):137–154, 1992.
[2] Implementation of KLT feature tracking algorithm, https://www.mathworks.com /help/vision/examples/face-detection-and-tracking-using-the-klt-algorithm.html
Node.JS bindings for Valve’s LZSS compression codec
Installing
Run npm install node-valve-lzss and you’re good to go
Make sure to have installed an C++ compiler and node-gyp, you don’t have it? Install with npm install -g node-gyp AND a compiler for your system before installing this.
Usage
constvalveLZSS=require("node-valve-lzss");// CompressconstcompressedData=valveLZSS.compress(buffer);// returns <Buffer>// UncompressconstdecompressedData=valveLZSS.uncompress(compressedData);// returns <Buffer>// Detect if it's compressedconstisCompressed=valveLZSS.isCompressed(compressedData);// returns true or false// Get Uncompressed size from compressed dataconstgetActualSize=valveLZSS.getActualSize(compressedData);// returns a number representing the size in bytes of uncompressed data
At compression, if you pass an string or ArrayBuffer it would be automatically converted into an Buffer.
Before you use this
For unknown reasons, certain data can’t be compressed and the library will throw an error detailing the reason at it’s best
The solution to these cases is up to you, some tips would be padding the data, splitting into chunks, etc. Probably such errors would stay unfixed as I don’t have the current knowledge yet to track these bugs and fix them in an appropriate way.
For your own sanity, please DON’T use this in production code UNLESS you know what are you doing.
Contributions
Contributions are welcome! But please detail them as good as possible. Since this is an quite cryptic project and a lot of things can go wrong, you should do it.
The API endpoint is GET [project_url]/api/timestamp/:date_string?
A date string is valid if can be successfully parsed by new Date(date_string) (JS) . Note that the unix timestamp needs to be an integer (not a string) specifying milliseconds. In our test we will use date strings compliant with ISO-8601 (e.g. "2016-11-20") because this will ensure an UTC timestamp.
If the date string is empty it should be equivalent to trigger new Date(), i.e. the service uses the current timestamp.
If the date string is valid the api returns a JSON having the structure {"unix": <date.getTime()>, "utc" : <date.toUTCString()> }
e.g. {"unix": 1479663089000 ,"utc": "Sun, 20 Nov 2016 17:31:29 GMT"}.
If the date string is invalid the api returns a JSON having the structure { "error" : "Invalid Date" }. It is what you get from the date manipulation functions used above.
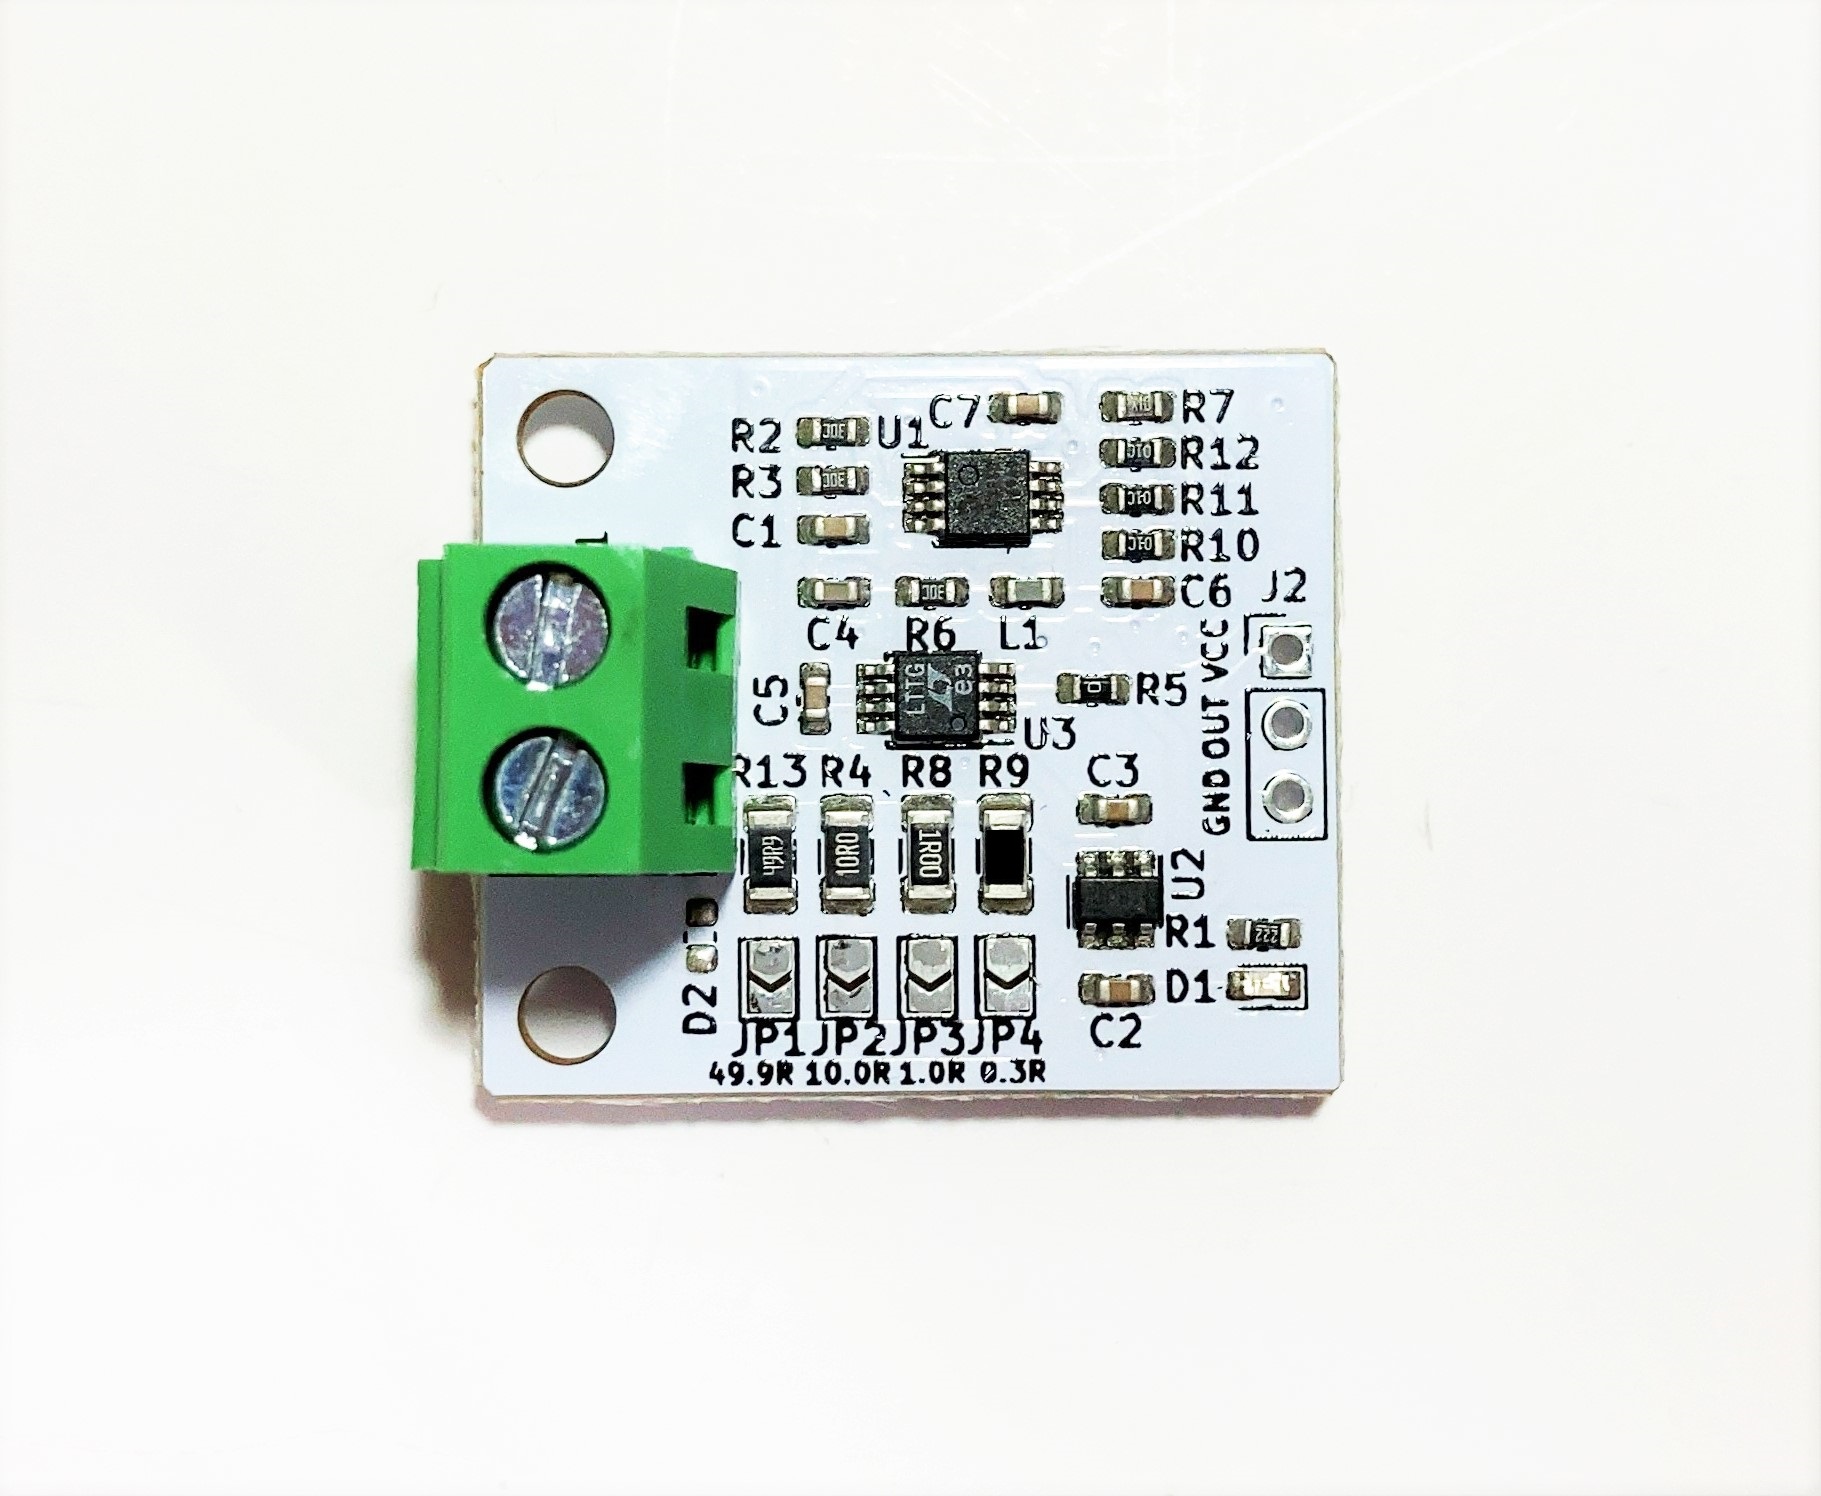
This board amplifies the output of a clamp-type CT sensor and converts it to an RMS value (effective value).
The RMS value (effective value) according to the AC current can be obtained as an analog value (DC).
Since it is equipped with a shunt resistor and an IC for calculating the RMS value, it is possible to obtain the effective value of the AC current as an analog value.
Since the effective value can be obtained as an analog value, high sampling AD conversion and RMS calculation on the microcontroller side are not required.
You can choose from four types of shunt resistors: 49.9Ω, 10Ω, 1Ω, and 0.3Ω.
Although it depends on the shunt resistor and CT sensor, it can measure from a minimum of 0.1A to a maximum of about 300A (when using a 3.3V power supply).
Board size 25mm x 30mm, fixing hole M3x2 Width 20mm
Conversion formula
The INA181A1 has a gain of 20x, and the output stage amplifier has a gain of 3x, giving a total amplification rate of 60x.
VOUT= (I x Gain x R)/CT
I = (VOUT x CT)/(Gain x R)
VOUT: Analog output voltage (V), I: CT sensor target current (A), Gain: 60x (fixed), R: Shunt resistance (Ω), CT: Winding ratio
ex) VOUT=(IxGainxR)/(CT ratio)=(Ix60x49.9)/3000
Shunt resistance and measurement current range guideline
Minimum and maximum current guideline for each shunt resistance when using a 1:3000 CT sensor
Maximum current is set based on the voltage that is the guideline for amplifier saturation
Minimum current is set as a guideline where the effect of offset voltage of several tens of mV can be ignored
Shunt resistance
Minimum current A (power supply 3.3V)
Maximum current A (power supply 3.3V)
Minimum current A (power supply 5V)
Maximum current A (power supply 5V)
49.9
0.1
3
0.1
5
10.0
0.5
15
0.5
23
1.0
5
150
5
230
0.3
10
340
10
500
Caution
CT sensor is not included.
Use a CT sensor with a winding ratio of approximately 1:2000~3000.
When using, be sure to jumper one of the shunt resistors.
Due to the characteristics of the CT sensor, if the secondary side is released with a live line, a voltage of several kV will be generated, which may damage the CT or cause electric shock.
To prevent damage to the CT or electric shock, we recommend using a CT sensor with a built-in output protection element.
The power supply supports 3.3V and 5V, but a 5V power supply provides a larger range, allowing you to measure more current.
Outputs above the power supply voltage will not be output correctly because the amplifier will saturate.
Due to the effects of the input impedance of the AD conversion and offset voltage, an output voltage of several tens of mV will be generated even at a current of 0A.
Not suitable for measuring small currents below the minimum current of each shunt resistor.
Intended for use in measuring the current of a 50Hz/60Hz commercial power supply with a CT sensor.
True RMS values are calculated using an RMS calculation IC, but if there is a lot of distortion or noise, measurements may not be taken correctly. * Current changes above a few hundred Hz cannot be measured because the low-pass filter in the circuit cuts off high frequencies.
To ensure that your code is valid and stable use check:
./gradlew check
License
MIT License

Copyright (c) 2017 Mohammed Touban

Permission is hereby granted, free of charge, to any person obtaining a copy
of this software and associated documentation files (the "Software"), to deal
in the Software without restriction, including without limitation the rights
to use, copy, modify, merge, publish, distribute, sublicense, and/or sell
copies of the Software, and to permit persons to whom the Software is
furnished to do so, subject to the following conditions:

The above copyright notice and this permission notice shall be included in all
copies or substantial portions of the Software.

THE SOFTWARE IS PROVIDED "AS IS", WITHOUT WARRANTY OF ANY KIND, EXPRESS OR
IMPLIED, INCLUDING BUT NOT LIMITED TO THE WARRANTIES OF MERCHANTABILITY,
FITNESS FOR A PARTICULAR PURPOSE AND NONINFRINGEMENT. IN NO EVENT SHALL THE
AUTHORS OR COPYRIGHT HOLDERS BE LIABLE FOR ANY CLAIM, DAMAGES OR OTHER
LIABILITY, WHETHER IN AN ACTION OF CONTRACT, TORT OR OTHERWISE, ARISING FROM,
OUT OF OR IN CONNECTION WITH THE SOFTWARE OR THE USE OR OTHER DEALINGS IN THE
SOFTWARE.


 https://github.com/0xDaksh/passwordjs