In your first run, go to Preferences... menu and set a path for your desired video player.
Usage
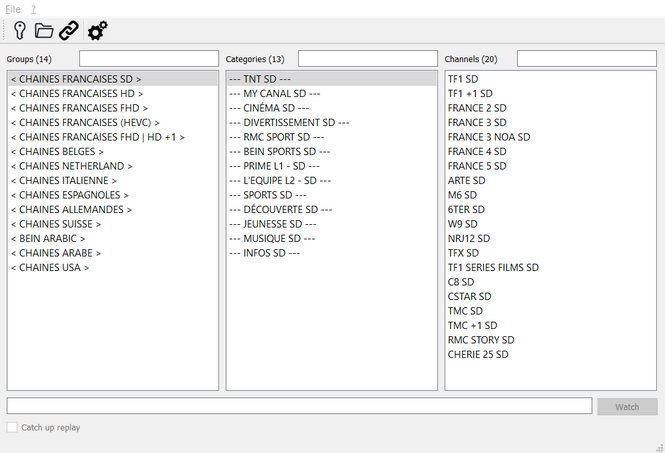
Main window
1. Menu bar
Get quick access to the main features of the application (open Xtream Code, open playlist, preferences, …).
2. Filter
When you have a lot of groups / categories / channels, you can filter them using this text areas.
3. Groups
List of groups.
Groups come from the values in Xtream API (if available), from the playlist (if available).
If the groups do not exist, the application will create them artificially according to the parameters.
Select a group to view it’s categories.
4. Categories
List of categories.
The application will create them artificially according to the parameters.
Select a category to view it’s channels.
5. Channels
List of channels.
Select a channel to view it’s URL.
Double-click on a channel to open it with your player.
6. Watch
You can see the URL of the selected channel.
Click the Watch button to open it with your player.
7. Catch up
Some stream may have a catch up replay available. If so, check the Catch up chckbox, select a date, a time and duration and click the Watch button.
You can find the current EPG in the combo box to easily choose your desired program.
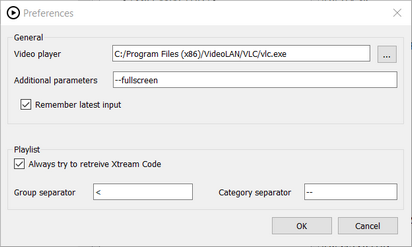
Preferences
Video player
Give a path to your favorite video player executable.
Eg. : C:/Program Files (x86)/VideoLAN/VLC/vlc.exe
Additional parameters
(optional) You can provide additional parameters to use with your player.
Eg. : --fullscreen will launch VLC in fullscreen.
Remember latest input
When checked, by default the program will remember your playlist local or remote path, and your Xtream code credentials.
Always try to retreive Xtream Code
When checked, if you load a playlist the program will first give a try to the Xtream Code API.
Xtream Code API allows to have better group naming and to play catch up streams.
Group / category separator
Very often the channels in the playlist are separated by false channels to mark the boundary.
Whith this parameter, you can specify what are the strings used as separator.
as category separator, all lines containing < will be considered as “group” and all lines containing -- will be considered as “category”.
You’ll obtain:
Load playlist from Xtream Code
Give your Xtream Code credentials.
Load playlist from local file
Open a local playlist file (m3u).
A preview of the names inside the file allows you to guess what separators should be used.
Type part of desired group, category or channel you want to filter.
Watch a stream
Double-click on an entry in the channel list, or select it then click on the Watch button.
Replay a past stream
If you opened your playlist with Xtream Code and your provider gives this functionality, you can select a time and date for a specific channel.
A list gives you the latest EPG availble to help you.
Note that not all providers gives this functionality.
In your first run, go to Preferences... menu and set a path for your desired video player.
Usage
Main window
1. Menu bar
Get quick access to the main features of the application (open Xtream Code, open playlist, preferences, …).
2. Filter
When you have a lot of groups / categories / channels, you can filter them using this text areas.
3. Groups
List of groups.
Groups come from the values in Xtream API (if available), from the playlist (if available).
If the groups do not exist, the application will create them artificially according to the parameters.
Select a group to view it’s categories.
4. Categories
List of categories.
The application will create them artificially according to the parameters.
Select a category to view it’s channels.
5. Channels
List of channels.
Select a channel to view it’s URL.
Double-click on a channel to open it with your player.
6. Watch
You can see the URL of the selected channel.
Click the Watch button to open it with your player.
7. Catch up
Some stream may have a catch up replay available. If so, check the Catch up chckbox, select a date, a time and duration and click the Watch button.
You can find the current EPG in the combo box to easily choose your desired program.
Preferences
Video player
Give a path to your favorite video player executable.
Eg. : C:/Program Files (x86)/VideoLAN/VLC/vlc.exe
Additional parameters
(optional) You can provide additional parameters to use with your player.
Eg. : --fullscreen will launch VLC in fullscreen.
Remember latest input
When checked, by default the program will remember your playlist local or remote path, and your Xtream code credentials.
Always try to retreive Xtream Code
When checked, if you load a playlist the program will first give a try to the Xtream Code API.
Xtream Code API allows to have better group naming and to play catch up streams.
Group / category separator
Very often the channels in the playlist are separated by false channels to mark the boundary.
Whith this parameter, you can specify what are the strings used as separator.
as category separator, all lines containing < will be considered as “group” and all lines containing -- will be considered as “category”.
You’ll obtain:
Load playlist from Xtream Code
Give your Xtream Code credentials.
Load playlist from local file
Open a local playlist file (m3u).
A preview of the names inside the file allows you to guess what separators should be used.
Type part of desired group, category or channel you want to filter.
Watch a stream
Double-click on an entry in the channel list, or select it then click on the Watch button.
Replay a past stream
If you opened your playlist with Xtream Code and your provider gives this functionality, you can select a time and date for a specific channel.
A list gives you the latest EPG availble to help you.
Note that not all providers gives this functionality.
If you donot have Trakt client id, You will need to generate it from Trakt.
Login to your account in trakt.tv (Trakt)
Click on your profile (avatar) showing in corner
Click on Settings
Click on “Your API Apps”
provide the details and submit the request.
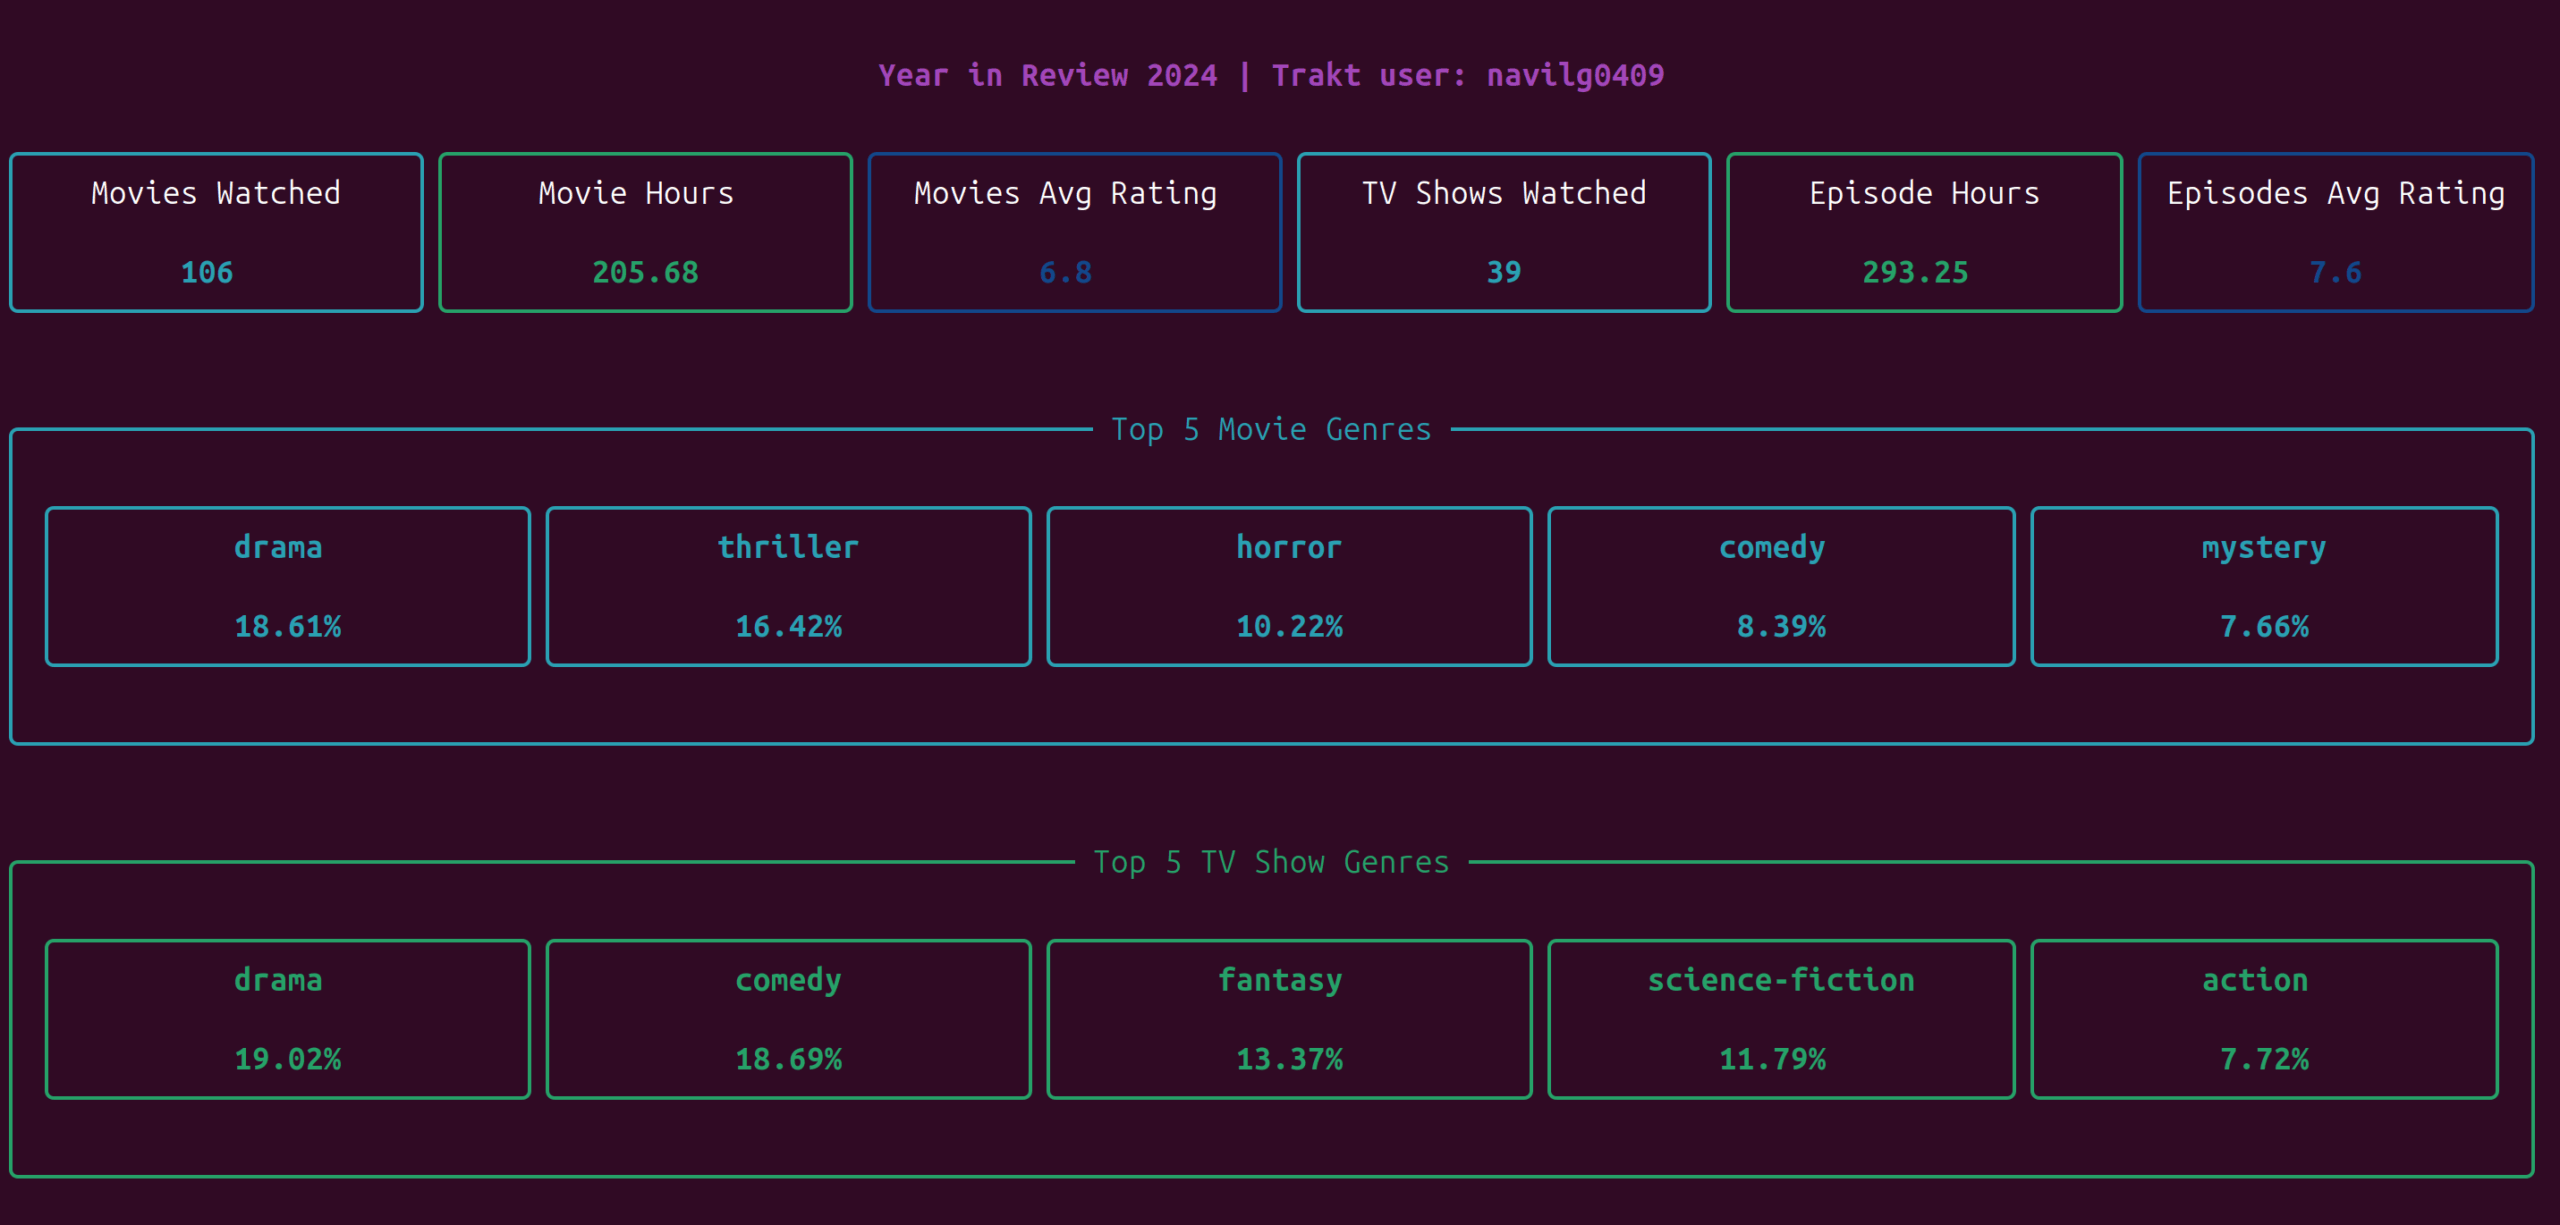
You will receive client id and client secret. It may take sometime to receive the API keys depending on time taken by Trakt to verify your information.
Steps
Install required python modules
pip install -r requirements.txt
Make your Trakt profile as public from Trakt’s account setting (Make it private again after generating year in review)
Create .env file from .env.example file
cp .env.example .env
Update trakt user name, trakt client id and year in .env file
Run below command on full terminal screen
python generate.py
Alternatively, You can also pass trakt user name, year and client id in command line argument
python generate.py user_id 2024 trakt_client_id
Make your Trakt profile as private again from Trakt’s account setting.
If you donot have Trakt client id, You will need to generate it from Trakt.
Login to your account in trakt.tv (Trakt)
Click on your profile (avatar) showing in corner
Click on Settings
Click on “Your API Apps”
provide the details and submit the request.
You will receive client id and client secret. It may take sometime to receive the API keys depending on time taken by Trakt to verify your information.
Steps
Install required python modules
pip install -r requirements.txt
Make your Trakt profile as public from Trakt’s account setting (Make it private again after generating year in review)
Create .env file from .env.example file
cp .env.example .env
Update trakt user name, trakt client id and year in .env file
Run below command on full terminal screen
python generate.py
Alternatively, You can also pass trakt user name, year and client id in command line argument
python generate.py user_id 2024 trakt_client_id
Make your Trakt profile as private again from Trakt’s account setting.
Microsoft SQL Server (Not required on local machine if database is hosted on a server)
Steps To Run Project
Clone project.
First of all make sure if you want to rename database name then update Database connection settings in appSettings.json -> ConnectionStrings -> AcuCallContext.
You can create database, tables and stored procs using migration or script.
If you want to run Db script then skip from step 5 to 8. Then navigate to Sql\DbScript.sql and execute it.
Migration can be performed by opening Package Manager console and On top right selecting AcuCall.Infrastructure.Data from Default Project.
Then run command Update-Database, It will create database if it does not exist else perform migrations.
Once Migration is performed successfully, We need to enable Broker for Db notifications. So open your SQL Server instance.
Connect to your server instance, and execute ALTER DATABASE [DatabaseName] SET ENABLE_BROKER.
Executing migration or script will create a user admin with password admin.
Now you are all ready to start application.
Deployment Of Project
The very first step is to install .NET Core Runtime on your machine.
Setup IIS Configuration
Windows Server Operating Systems
Enable the Web Server (IIS) server role and establish role services
Use the Add Roles and Features wizard from the Manage menu or the link in Server Manager. On the Server Roles step, check the box for Web Server (IIS).
After the Features step, the Role services step loads for Web Server (IIS). Select the IIS role services desired or accept the default role services provided.
You can select different security levels from Web Server > Security if required.
Proceed through the Confirmation step to install the web server role and services. A server/IIS restart isn’t required after installing the Web Server (IIS) role.
Windows Desktop Operating Systems
Enable the IIS Management Console and World Wide Web Services
Navigate to Control Panel > Programs > Programs and Features > Turn Windows features on or off (left side of the screen).
Open the Internet Information Services node. Open the Web Management Tools node.
Check the box for IIS Management Console.
Check the box for World Wide Web Services.
Accept the default features for World Wide Web Services.
You can select different security levels from World Wide Web Services > Security if required.
If the IIS installation requires a restart, restart the system.
Now Create IIS Site
On the hosting system, create a folder to contain the app’s published folders and files.
Within the new folder, create a logs folder to hold ASP.NET Core Module stdout logs when stdout logging is enabled. If logs folder already exist then we don’t need to create it. This folder will hold error logs happening in website.
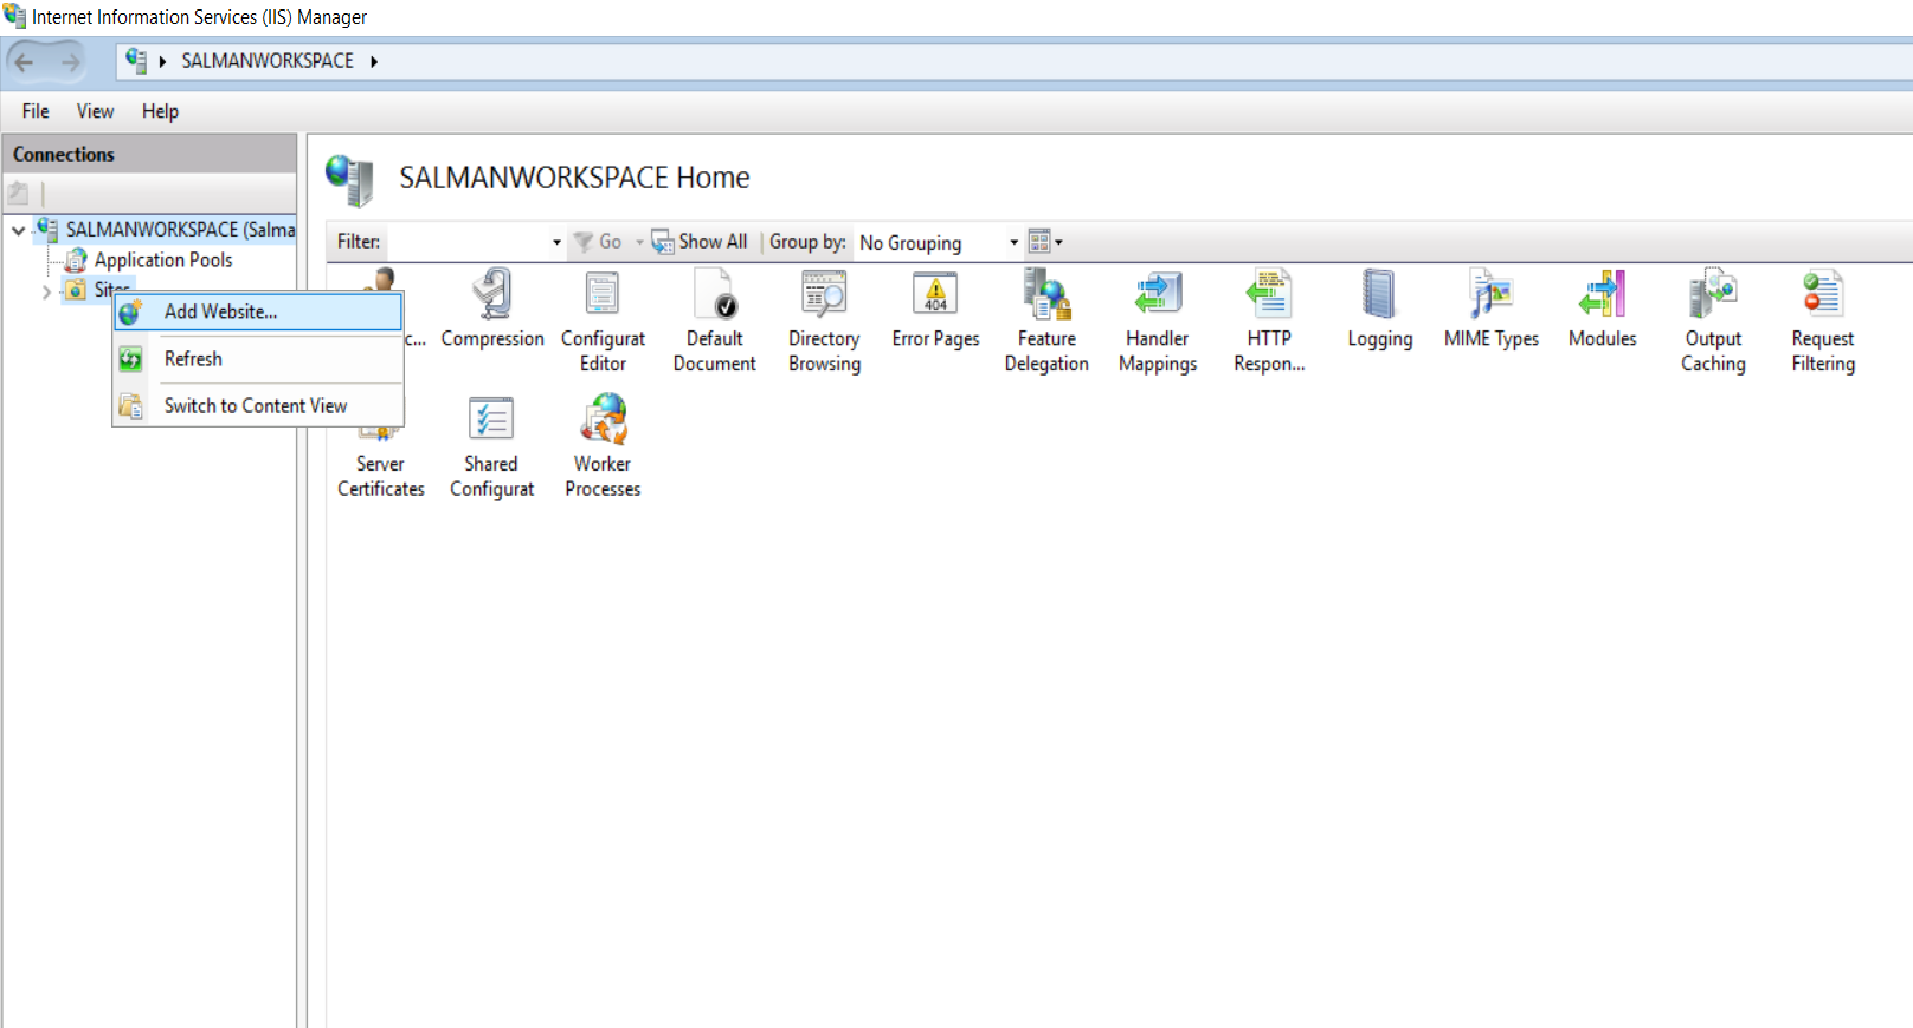
Open IIS Manager and then open the server’s node in the Connections panel. Right-click the Sites folder. Select Add Website from the contextual menu.
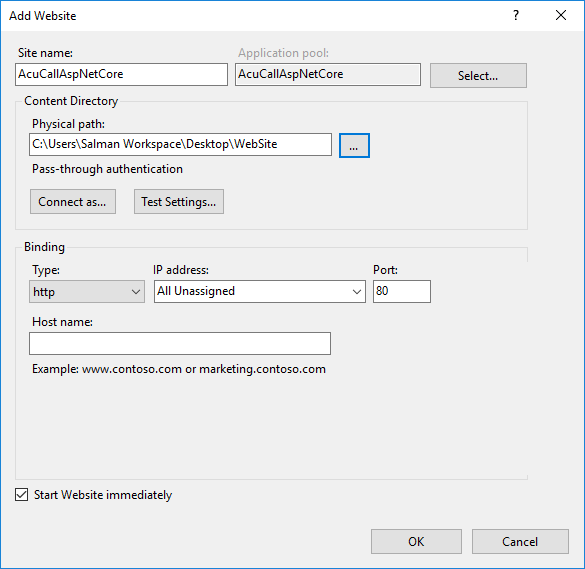
Provide a Site name and set the Physical path to the app’s deployment folder. Provide the Binding configuration by default port is 80 and create the website by selecting OK.
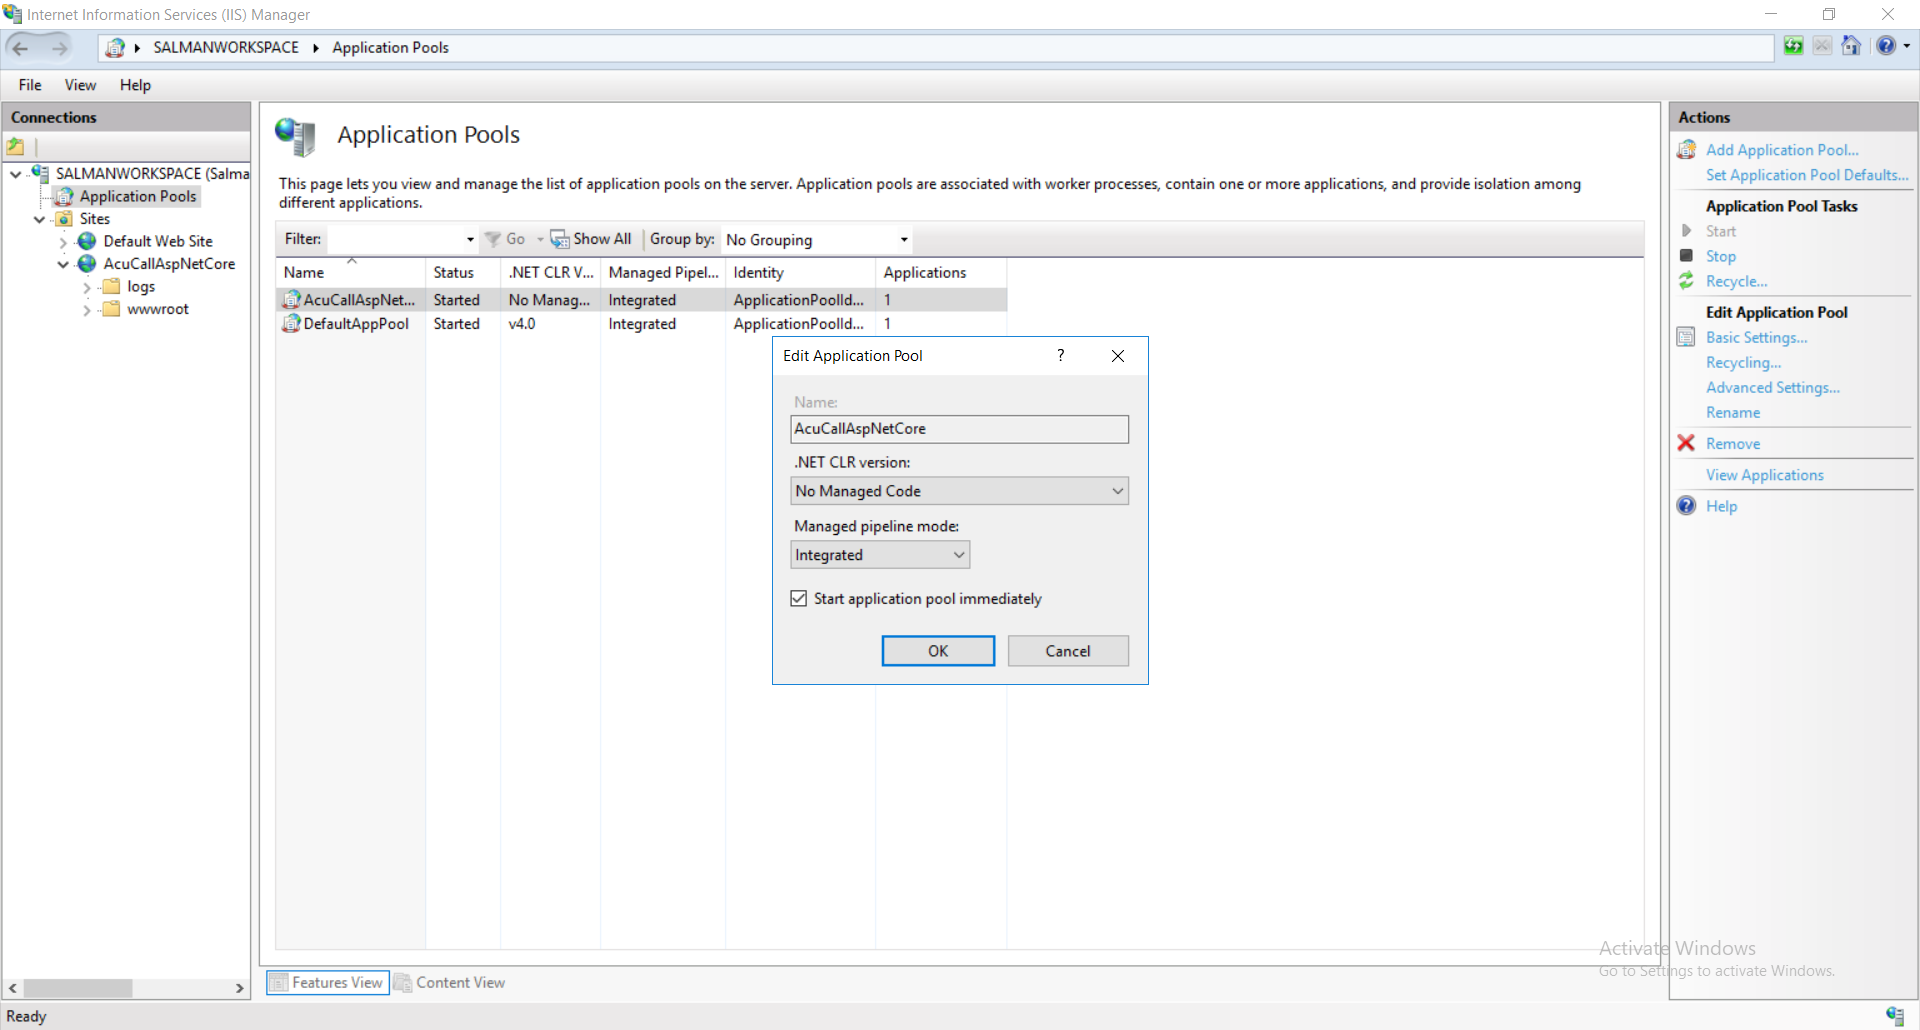
Under the server’s node, select Application Pools.
Right-click the site’s app pool and select Basic Settings from the contextual menu.
In the Edit Application Pool window, set the .NET CLR version to No Managed Code. As ASP.NET Core runs in a separate process and manages the runtime. ASP.NET Core doesn’t rely on loading the desktop CLR. Setting the .NET CLR version to No Managed Code is optional.
Deploy App
Deploy the app to the folder created on the hosting system by following below steps.
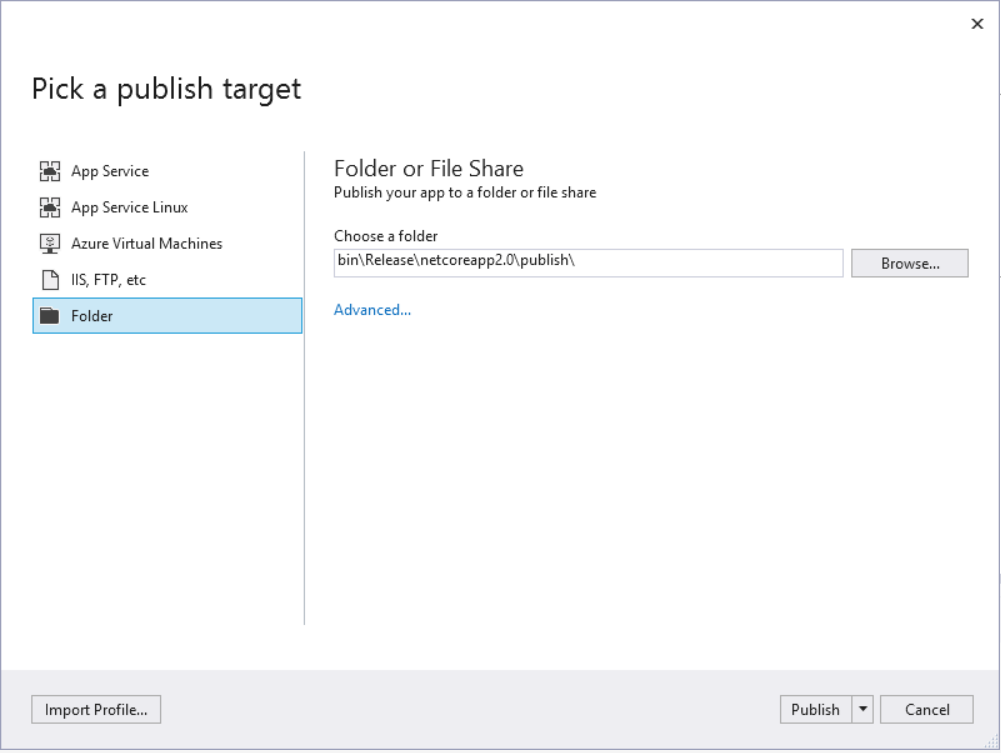
Right-click the project AcuCall.Web and select Publish.
When Folder is selected, specify a folder path to store the published assets. The default folder is bin\Release\PublishOutput but we need to set the path of Physical Path while creating new website in IIS Manager. Click the Publish button to finish.
NOW your application is served on localhost:[BindingPort]
For more further information regarding deployment you can visit Microsoft website.
Configure IIS To Access Website Using IP Address
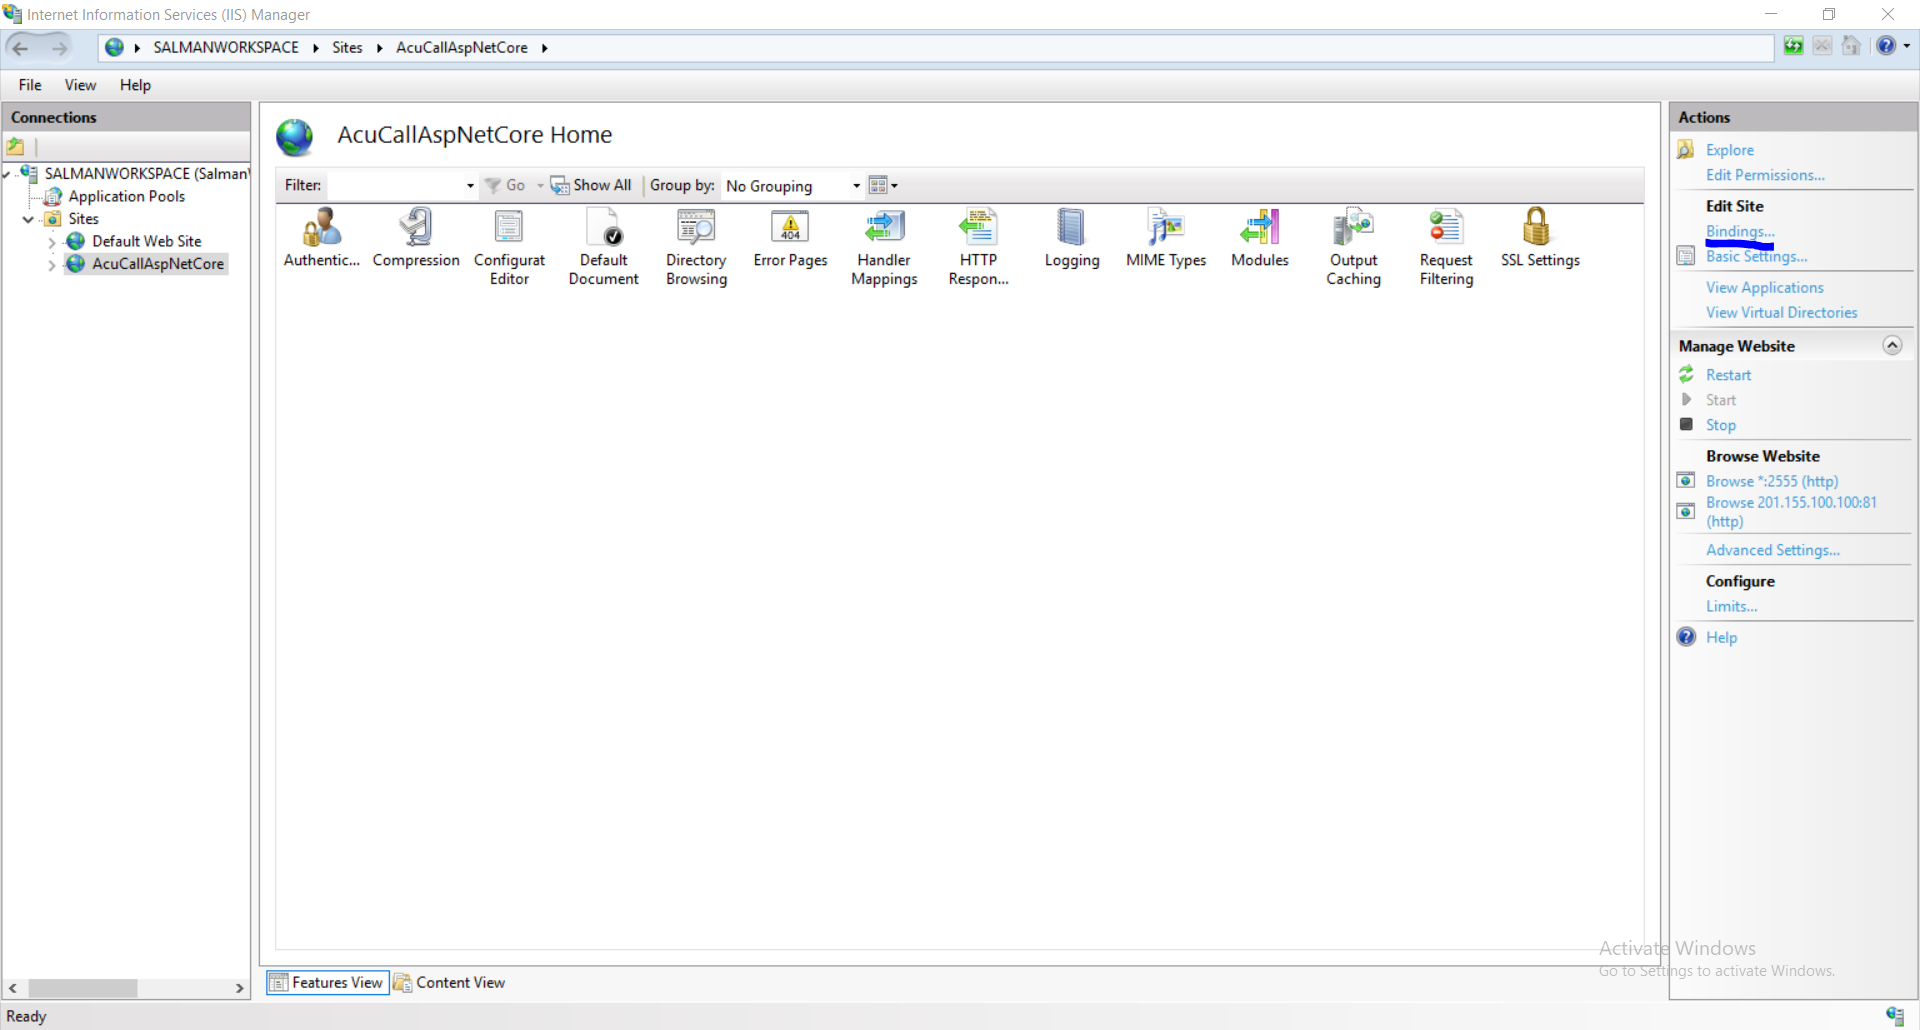
Open IIS Manager Console, It can be found in Administrative Tools -> Internet Information Services (IIS) Manager.
In the Connections pane of IIS, expand the Sites and select the website AcuCallAspNetCore this is what i have named previously in this doc or the one you have named.
Click on Bindings link and you will see current bindings of that website.
Click on Add button.
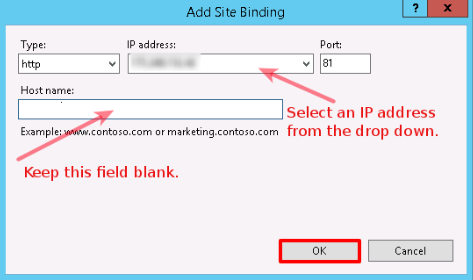
On the Add Site Binding window, keep website Type as http. Select an IP address from the drop-down menu upon which you want to bind the website. Since other websites (along with their Host Header Values) are already bound on port 80, you won’t be able to bind this new website on port 80 without Host Header Value (Host name). So, specify a port number (other than default port 80) on which you want to bind this new website. Keep Host name as blank, click OK and then Close. Once the binding is added in IIS Manager, the next step is allowing a port in Windows Firewall.
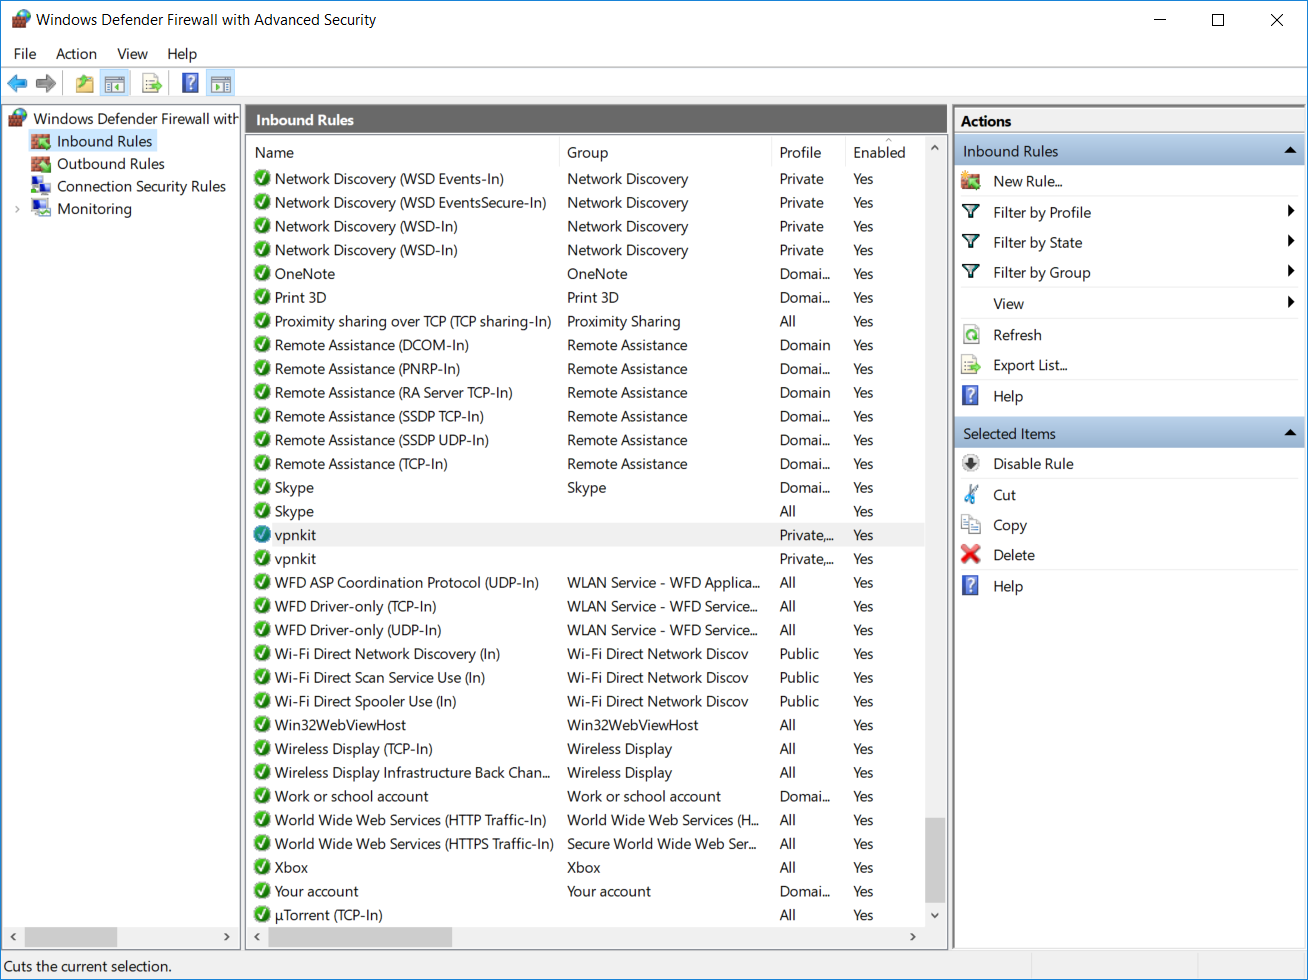
Go to Administrative Tools -> Windows Defender Firewall with Advanced Security.
At Windows Firewall window, click on Inbound Rules.
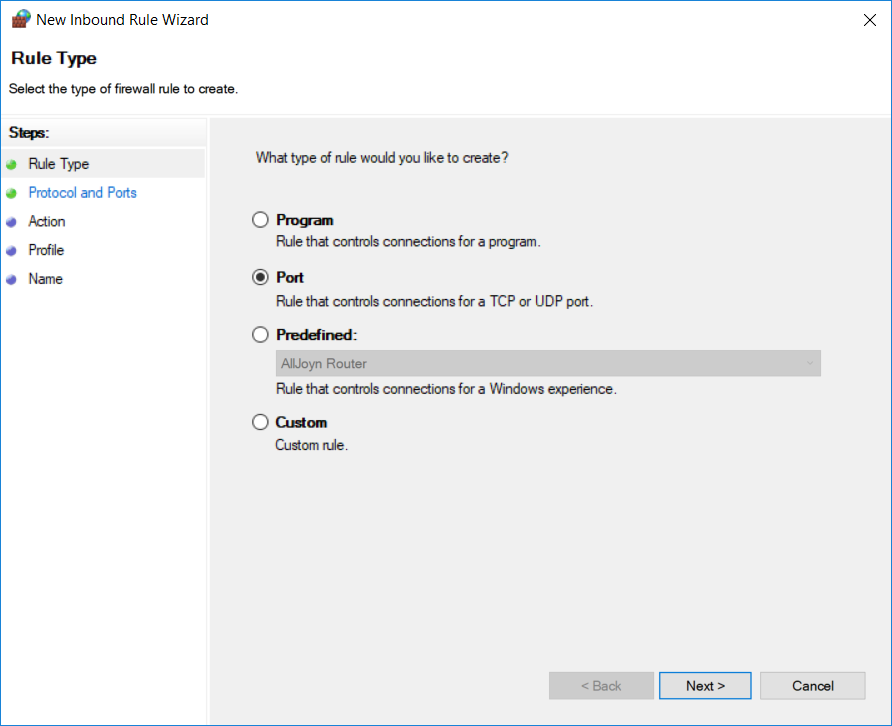
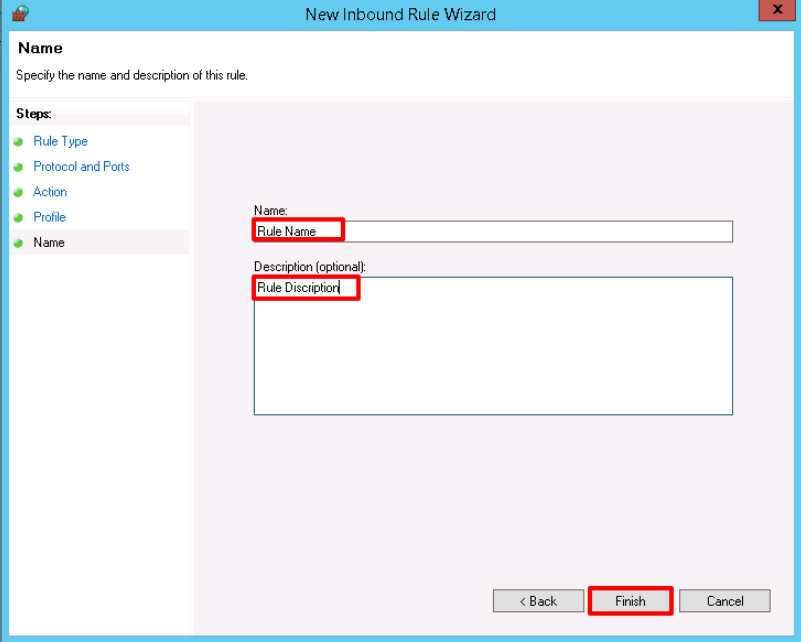
Under Actions pane, click on New Rule and New Inbound Rule Wizard will be opened. On this window, select the Port radio button and click on Next.
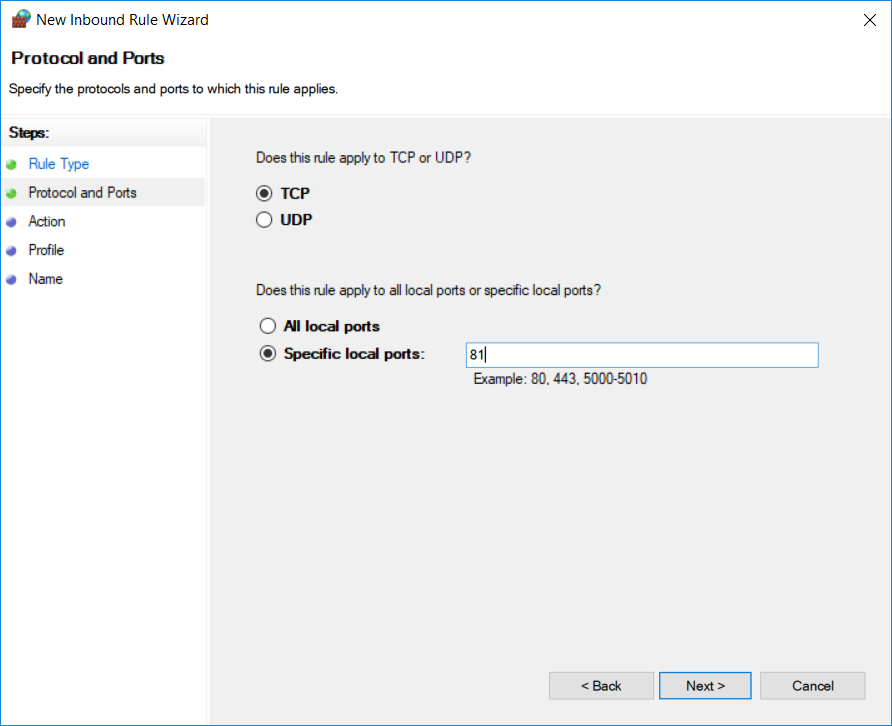
On the next screen, select TCP and Specific local ports radio button. Specify a port number (upon which you set binding in IIS) in Specific local ports field and click Next.
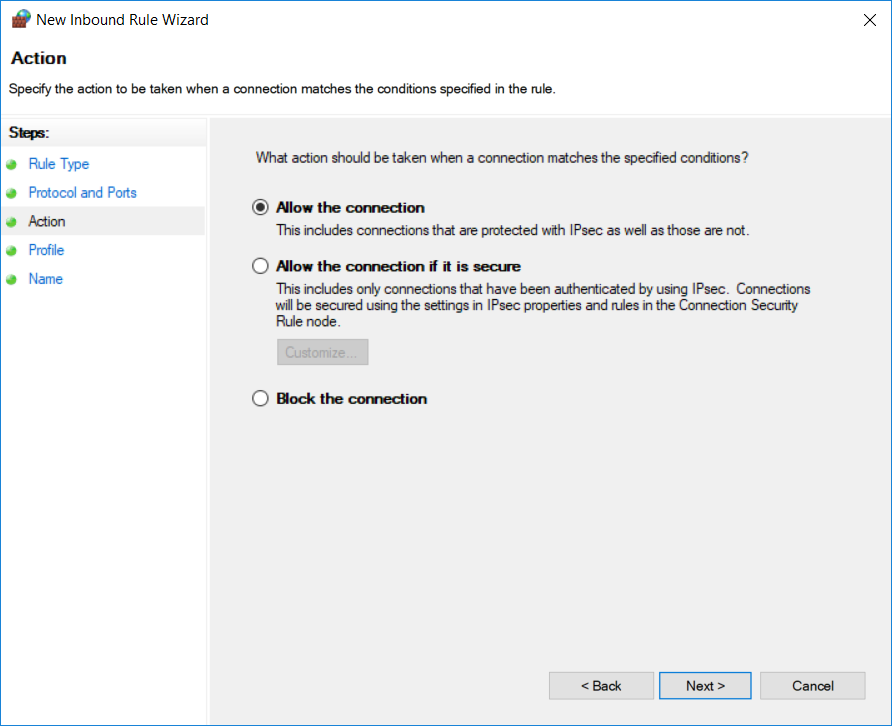
On the next screen, select Allow the connection and click Next.
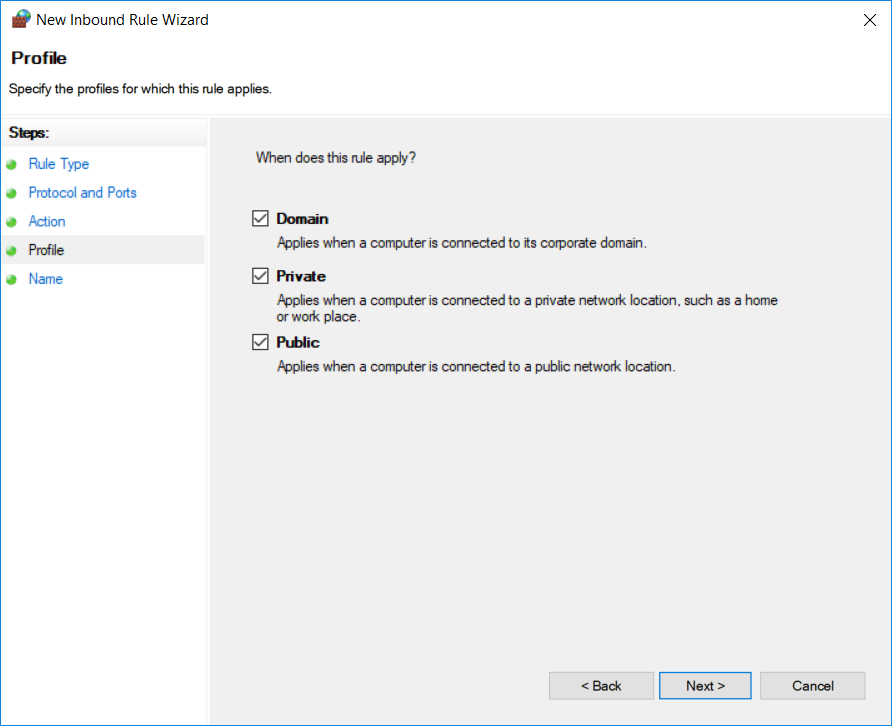
Select the profiles for those we want to apply this rule and click Next.
Very last step is to provide Name and Description for the newly created rule & click Finish.
Check out the core AI behaviors in the videos below (click on an image to open a youtube video).
Flanking behavior
When navigating to the player, the AI will try to flank the player.
This behavior is implemented using A* routing with a distance metric biased away from the player’s line of sight.
The visibility bias is intuitively very simple: consider visible locations further away by a constant factor.
This approach works fairly well to avoid moving into player view when near the player while smoothly transitioning to normal movement far away from the player.
When the AI spots the player, it records a snapshot of the player’s view, finds a nearby hiding place, and then routes to the player using A* with respect to the snapshot of the player’s view.
Searching behavior
The AI will default to searching for the player when
The player hasn’t been spotted yet.
The AI has lost track of the player.
More details on the second case: when the AI spots the player, it will hide and then navigate to the last known player location for an attack.
This can fail when the player has moved behind cover while out of the enemy’s line of sight.
This is what is meant by losing track of the player.
Running the demo
NOTE: this project has only been tested on macOS Monetery 12.4 with an M1 chip. While other platforms / architectures have not been tested, any changes to build.zig should be minimal.
INSTALLATION
You need to install the following dependencies before building:
SDL2
SDL2_Image
On macOS, you can install these via brew install sdl2 sdl2_image.
Right-click to spawn a wall at the mouse position.
Spacebar to spawn an enemy at the mouse position.
Use the mouse to control the line-of-sight.
Project Organization
src/game.zig contains the core game loop and GameState definition. Additionally:
ECS systems are defined here e.g. handlePlayer
The HTN planner is defined here as an ECS system handleEnemyAI.
src/ai.zig Defined the HTN domain, as well as the conditions, operators, and sensors needed by the HTN planner to run the AI.
src/htn/ Contains the HTN planner, domain builder, and world state definition. Currently, the world state is specialized to this demo, meaning that this HTN implementation requires a small amount of work to be used in other projects.
src/ecs/ecs.zig Contains a generic ECS implementation. It is not currently optimized.
This is an application, which keep your image files to be small file sized. I build this application for my home-made server (ODROID N2+, Ubuntu 22.04).
How it works?
This application is using ‘Pillow’ library to compress image files. It will compress image files in the source path and save them to the destination path. If the destination path is not exist, it will create it automatically. The original file will be deleted.
It keeps observing the source path, if there is a new image file, it will compress it and save it to the destination path while it is running.
Why did you build this?
Google Photos no longer provide unlimited storage for free, and I was bored.
How to use.
0. Prerequisites
python3.11
pip3
virtualenv
You need to install more libraries, which are in the ‘requirements.txt’ file, after you create virtual environment and activate it.
1. Install python3.11, pip3 and virtualenv (if you don’t have them)
sudo apt-get -y install python3.11 python3-pip virtualenv
# you probably use yum or something else. you would know.
2. Clone this repository and create virtual environment
nohup python -u observer.py &
tail -f nohup.out
# or you just
./start.sh
# it gives you tail =f nohup.out# to stop watching log : CTRL+C
How to stop application
ps -ef | grep observer.py
kill -9 <pid># or you just
./stop.sh
I want to watch some logs
tail -f nohup.out

# or you just
./watch_logs.sh
More Things to do ~
Implement async I/O
Better performance and structures for async I/O
Make a script for stopping application
Make this application as a service (systemd)
Make a script for installation (not sure if it is necessary
Tested environment
I tested this application on Ubuntu 22.04 (Odroid N2+) & Windows 11(My gaming desktop).
Well, It was fast as the file transfer speed of my server, at least.
This package provides a big range of useful date scopes for your Laravel Eloquent models!
Let’s assume you have a Transaction model.
If you now give it the DateScopes trait, you can do something like this:
useLaracraftTech\LaravelDateScopes\DateScopes;
class Transaction extends Model
{
use DateScopes;
}
// query transactions created today
Transaction::ofToday();
// query transactions created during the last week
Transaction::ofLastWeek();
// query transactions created during the start of the current month till now
Transaction::monthToDate();
// query transactions created during the last year, start from 2020
Transaction::ofLastYear(startFrom: '2020-01-01');
// ... and much more scopes are available (see below)// For sure, you can chain any Builder function you want here.// Such as these aggregations, for instance:
Transaction::ofToday()->sum('amount');
Transaction::ofLastWeek()->avg('amount');
In statistics, when asking for “the last 7 days”, the current day may or may not be included
in the calculation depending on the context and the specific requirements of the analysis.
If you want to include the current day in the calculation, you would generally use an inclusive range,
meaning that you would include records created on the current day as well as records
created in the previous 6 days.
If you want to exclude the current day in the calculation, you would generally use an exclusive range,
meaning that you would include records created in the previous 7 days,
but not records created on the current day.
Ultimately, it depends on the context and what you’re trying to achieve with your data.
It’s always a good idea to clarify the requirements and expectations with stakeholders
to ensure that you’re including or excluding the correct records.
The same concept applies to other time intervals like weeks, months, quarters, and years etc.
The default for this package is exclusive approach,
which means when you for instance query for the last 7 days it will not include the current day!
You can change the default if you need in the published config file.
This is the contents of the published config file:
return [
/** * If you want to include the current day/week/month/year etc. in the range, * you could use the inclusive range here as a default. * Note that you can also fluently specify the range for quite every scope we offer * directly when using the scope: * Transaction::ofLast7Days(customRange: DateRange::INCLUSIVE); (this works for all but the singular "ofLast"-scopes) * This will do an inclusive query, even though the global default range here is set to exclusive. */'default_range' => env('DATE_SCOPES_DEFAULT_RANGE', DateRange::EXCLUSIVE->value),
/** * If you use a global custom created_at column name, change it here. */'created_column' => env('DATE_SCOPES_CREATED_COLUMN', 'created_at'),
];
If you want to change the default range to inclusive set DATE_SCOPES_DEFAULT_RANGE=inclusive in your .env.
Fluent date range configuration
As already mentioned above in the default_range config description text,
you can also fluently specify the range for quite every scope we offer
directly when using the scope:
// This works for all "ofLast"-scopes, expect the singulars like "ofLastHour",// because it would not make sense for those.
Transaction::ofLast7Days(customRange: DateRange::INCLUSIVE);
This will do an inclusive query (today-6 days), even though the global default range here was set to exclusive.
Fluent created_at column configuration
If you only want to change the created_at field in one of your models and not globally just do:
useLaracraftTech\LaravelDateScopes\DateScopes;
class Transaction extends Model
{
use DateScopes;
public$timestamps = false;
constCREATED_AT = 'custom_created_at';
}
// also make sure to omit the default $table->timestamps() function in your migration// and use something like this instead: $table->timestamp('custom_created_at')->nullable();
Custom start date
If you want data not starting from now, but from another date, you can do this with:
// query transactions created during 2019-2020
Transaction::ofLastYear(startFrom: '2020-01-01')
Custom datetime column
If you want to use column other than created_at column, you can pass the column name as parameter to the scope:
// query by SECONDS
Transaction::ofJustNow(); // query transactions created just now
Transaction::ofLastSecond(); // query transactions created during the last second
Transaction::ofLast15Seconds(); // query transactions created during the last 15 seconds
Transaction::ofLast30Seconds(); // query transactions created during the last 30 seconds
Transaction::ofLast45Seconds(); // query transactions created during the last 45 seconds
Transaction::ofLast60Seconds(); // query transactions created during the last 60 seconds
Transaction::ofLastSeconds(120); // query transactions created during the last N seconds
Minutes
// query by MINUTES
Transaction::ofLastMinute(); // query transactions created during the last minute
Transaction::ofLast15Minutes(); // query transactions created during the last 15 minutes
Transaction::ofLast30Minutes(); // query transactions created during the last 30 minutes
Transaction::ofLast45Minutes(); // query transactions created during the last 45 minutes
Transaction::ofLast60Minutes(); // query transactions created during the last 60 minutes
Transaction::ofLastMinutes(120); // query transactions created during the last N minutes
Hours
// query by HOURS
Transaction::ofLastHour(); // query transactions created during the last hour
Transaction::ofLast6Hours(); // query transactions created during the last 6 hours
Transaction::ofLast12Hours(); // query transactions created during the last 12 hours
Transaction::ofLast18Hours(); // query transactions created during the last 18 hours
Transaction::ofLast24Hours(); // query transactions created during the last 24 hours
Transaction::ofLastHours(48); // query transactions created during the last N hours
Days
// query by DAYS
Transaction::ofToday(); // query transactions created today
Transaction::ofYesterday(); // query transactions created yesterday
Transaction::ofLast7Days(); // query transactions created during the last 7 days
Transaction::ofLast21Days(); // query transactions created during the last 21 days
Transaction::ofLast30Days(); // query transactions created during the last 30 days
Transaction::ofLastDays(60); // query transactions created during the last N days
Weeks
// query by WEEKS
Transaction::ofLastWeek(); // query transactions created during the last week
Transaction::ofLast2Weeks(); // query transactions created during the last 2 weeks
Transaction::ofLast3Weeks(); // query transactions created during the last 3 weeks
Transaction::ofLast4Weeks(); // query transactions created during the last 4 weeks
Transaction::ofLastWeeks(8); // query transactions created during the last N weeks
Months
// query by MONTHS
Transaction::ofLastMonth(); // query transactions created during the last month
Transaction::ofLast3Months(); // query transactions created during the last 3 months
Transaction::ofLast6Months(); // query transactions created during the last 6 months
Transaction::ofLast9Months(); // query transactions created during the last 9 months
Transaction::ofLast12Months(); // query transactions created during the last 12 months
Transaction::ofLastMonths(24); // query transactions created during the last N months
Quarters
// query by QUARTERS
Transaction::ofLastQuarter(); // query transactions created during the last quarter
Transaction::ofLast2Quarters(); // query transactions created during the last 2 quarters
Transaction::ofLast3Quarters(); // query transactions created during the last 3 quarters
Transaction::ofLast4Quarters(); // query transactions created during the last 4 quarters
Transaction::ofLastQuarters(8); // query transactions created during the last N quarters
Years
// query by YEARS
Transaction::ofLastYear(); // query transactions created during the last year
Transaction::ofLastYears(2); // query transactions created during the last N years
Decades
// query by DECADES
Transaction::ofLastDecade(); // query transactions created during the last decade
Transaction::ofLastDecades(2); // query transactions created during the last N decades
Centuries
The centuries may return a different range then you maybe would expect. For instance Transaction::ofLastCentury() would apply a range from 1901-01-01 00:00:00 to 2000-12-31 23:59:59.
Maybe you would expect a range from: 1900-01-01 00:00:00 to 1999-12-31 23:59:59.
// query by CENTURIES
Transaction::ofLastCentury(); // query transactions created during the last century
Transaction::ofLastCenturies(2); // query transactions created during the last N centuries
Millenniums
The millenniums may return a different range then you maybe would expect. For instance Transaction::ofLastMillennium() would apply a range from 1001-01-01 00:00:00 to 2000-12-31 23:59:59.
Maybe you would expect a range from: 1000-01-01 00:00:00 to 1999-12-31 23:59:59.
// query by MILLENNIUMS
Transaction::ofLastMillennium(); // query transactions created during the last millennium
Transaction::ofLastMillenniums(2); // query transactions created during the last N millenniums
toNow/toDate
// query by toNow/toDate
Transaction::secondToNow(); // query transactions created during the start of the current second till now (equivalent of just now)
Transaction::minuteToNow(); // query transactions created during the start of the current minute till now
Transaction::hourToNow(); // query transactions created during the start of the current hour till now
Transaction::dayToNow(); // query transactions created during the start of the current day till now
Transaction::weekToDate(); // query transactions created during the start of the current week till now
Transaction::monthToDate(); // query transactions created during the start of the current month till now
Transaction::quarterToDate(); // query transactions created during the start of the current quarter till now
Transaction::yearToDate(); // query transactions created during the start of the current year till now
Transaction::decadeToDate(); // query transactions created during the start of the current decade till now
Transaction::centuryToDate(); // query transactions created during the start of the current century till now
Transaction::millenniumToDate(); // query transactions created during the start of the current millennium till now
The options argument is a superset of the options defined for object-hash, with the same defaults (exception: the default algoritm is md5). There are also library-specific options.
Library-specific options:
transformer – a custom function that transforms Map keys/Set values prior to hashing. It does not affect the values that are stored.
mapValueTransformer – a custom function that transforms Map values prior to hashing. This is only relevant to the .equals/.contains operations from the Comparable interface, as well as the Bi-Directional DeepMap. It does not affect the values that are stored.
caseInsensitive – If true, all string values–including keys/values within objects and arrays–will be evaluated as case-insensitive. (default: false)
NOTE: This transform will always be applied AFTER transformer and mapValueTransformer, if applicable. For objects, it will be applied before replacer (from object-hash options).
This library also exposes a BiDirectionalDeepMap class, which supports O(1) lookups by both keys and values. It provides the following extended API:
hasValue(val: V): boolean: Returns true if val exists as a value in the map
getKeyByValue(val: V): K | undefined: Returns the key associated with val if it exists
deleteByValue(val: V): boolean: Removes the key-value pair whose value is val and returns true if found
Caveats
Note that this “two-way” map has the traditional caveats:
There is a ~2x memory footprint
Keys and values must be 1-to-1, meaning each key must have a distinct value and vice versa. This implementation will error if attempting to set a key-value pair whose value is already present in the map with a different key.
Static Utility Methods
areEqual(values, options?): Returns true if all elements in values are equal. This can be useful when you need to quickly
test equality of more than 2 values, or when you want to specify an equality transform (via options.transformer).
Notes/Caveats
This still supports primitive keys/values like traditional Map/Set.
Don’t mutate objects stored in the data structure. The internal representation is not affected by this mutation, so behavior may be unexpected.
Don’t mutate objects in the user-supplied transformer or mapValueTransformer functions. It will affect the stored version.
This implementation does not explicitly “handle” key collisions. However, with the default algorithm (MD5), even if a map contained one TRILLION entries, the probability of a collision on the next insert is only 0.000000000000001. If you need better odds, use SHA1, SHA256, etc.
CI/CD
Using Github Actions, the CI build will run on all pull requests and pushes/merges to main.


 https://github.com/PhunkyBob/iptv_playlist_browser